")

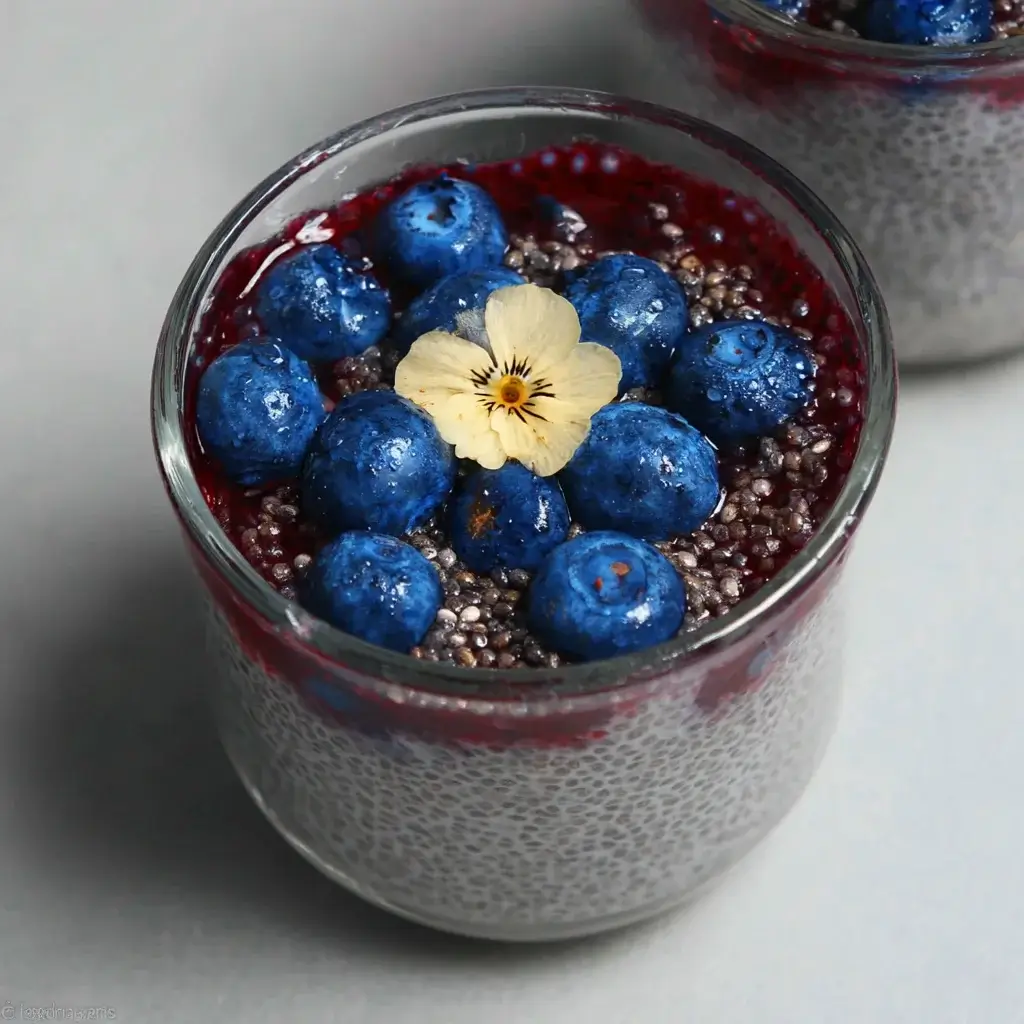
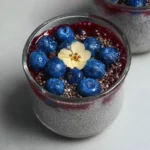
I used to think of breakfast as a necessary chore. It was something to be rushed through, often involving a bland bowl of cereal or a piece of toast grabbed on the way out the door. The idea of a breakfast that was both incredibly delicious and genuinely healthy—let alone one that was ready and waiting for me when I woke up—seemed like a fantasy. That all changed the day I discovered the magic of chia pudding. The first time I made this Blueberry Chia Pudding, I was skeptical. I mixed the tiny black seeds with milk and blueberries before bed, feeling like I was conducting a strange science experiment. But when I opened the fridge the next morning, I was greeted by a thick, creamy, vibrant purple pudding that looked more like a dessert than a breakfast. The first spoonful was a revelation: the creamy, tapioca-like texture of the plumped chia seeds, the sweet-tart burst of fresh blueberries in every bite, and a satisfying richness that felt incredibly indulgent. It was love at first taste. Now, this Blueberry Chia Pudding is my secret weapon for stress-free mornings. It’s my go-to meal prep breakfast that I know will start my day on a delicious, energized, and healthy note. It’s the breakfast that finally made me a morning person.
The Ultimate Blueberry Chia Pudding: A Creamy & Healthy Start to Your Day
This recipe is your guide to creating the perfect Blueberry Chia Pudding. It’s naturally vegan, gluten-free, and packed with fiber, protein, and healthy omega-3 fatty acids. This isn’t just a recipe; it’s a blueprint for a better breakfast. We will explore the simple ingredients, the foolproof method, and all the tips and tricks you need to make this a staple in your own kitchen.
The Simple, Powerful Ingredients
The beauty of this recipe lies in its simplicity. You only need a handful of wholesome ingredients to create this nutritional powerhouse. This recipe yields 2 generous servings.
- Chia Seeds: 1/4 cup. These tiny seeds are the star of the show. When submerged in liquid, they form a gel-like coating, which gives the pudding its signature thick texture. Both black and white chia seeds work equally well.
- Unsweetened Milk of Choice: 1 cup. The type of milk you use will affect the final flavor and creaminess.
- Unsweetened Almond Milk: A great low-calorie, neutral-flavored option.
- Canned Light Coconut Milk: Creates an incredibly rich and creamy pudding with a subtle tropical flavor.
- Oat Milk: Provides a naturally creamy texture and a slightly sweet taste.
- Dairy Milk: A classic choice that also works perfectly.
- Fresh or Frozen Blueberries: 1 cup. Blueberries are packed with antioxidants and provide natural sweetness and gorgeous color. If using frozen, there’s no need to thaw them first if you’re blending them into the pudding.
- Pure Maple Syrup: 1-2 tablespoons, or to taste. This adds a clean, natural sweetness that complements the blueberries beautifully. You can also use honey (if not vegan), agave nectar, or a few drops of liquid stevia.
- Vanilla Extract: 1/2 teaspoon. A small amount of pure vanilla extract enhances the other flavors and adds a warm, dessert-like quality.
- Pinch of Salt: Just a tiny pinch. Salt is a flavor enhancer and it balances the sweetness, making the overall taste more complex and delicious.
Step-by-Step Instructions for Perfect Pudding
Follow these two simple stages to create a smooth, flavorful, and perfectly set chia pudding.
Stage 1: Create the Blueberry Milk Base
This step ensures the blueberry flavor is infused throughout the entire pudding, not just dotted within it.
- Combine Ingredients: In a blender, add the 1 cup of milk, 1 cup of blueberries, 1-2 tablespoons of maple syrup, 1/2 teaspoon of vanilla extract, and a small pinch of salt.
- Blend Until Smooth: Blend on high speed for 30-60 seconds, or until the mixture is completely smooth and a beautiful, vibrant purple color. There should be no large pieces of blueberry skin remaining.
Stage 2: Mix and Chill
This is where the magic happens.
- Combine and Whisk: Pour the blended blueberry milk into a medium-sized bowl or a large mason jar (at least 16 ounces). Add the 1/4 cup of chia seeds. Whisk vigorously for about one minute to fully combine everything and ensure there are no clumps of chia seeds.
- The First Rest (The Anti-Clump Step): Let the mixture sit on the counter for 5-10 minutes. During this time, the chia seeds will begin to absorb the liquid and start the gelling process.
- The Second Whisk: After the initial rest, give the pudding another very thorough whisk. You will notice it has already started to thicken slightly. This second whisk is the secret to preventing the chia seeds from settling at the bottom and creating a perfectly uniform, clump-free pudding.
- Chill to Perfection: Cover the bowl or seal the jar and place it in the refrigerator to chill for at least 4 hours. For the best, thickest texture, let it chill overnight (6-8 hours). During this time, the chia seeds will fully absorb the liquid and transform the mixture into a thick, creamy pudding.
Nutrition Facts
Please note that these values are an approximation and will vary depending on the exact type of milk and sweetener you use. This is calculated for one serving (half of the total recipe).
- Servings: 2
- Calories Per Serving: Approximately 250-300 calories
- Key Benefits: This pudding is an excellent source of dietary fiber (which aids digestion and promotes fullness), plant-based protein, and ALA (alpha-linolenic acid), a type of heart-healthy omega-3 fatty acid.
Preparation Time
The hands-on time for this recipe is incredibly minimal, making it a perfect make-ahead option.
- Active Prep Time: 5-10 minutes
- Chilling Time: Minimum 4 hours, preferably overnight (8 hours)
- Total Time: 4-8 hours
How to Serve Your Blueberry Chia Pudding
Think of your chia pudding as a blank canvas. Serving it is all about the toppings and presentation, which can turn a simple breakfast into a stunning and satisfying meal.
- The Classic Parfait Jar:
- Layer the chia pudding in a clear glass or mason jar.
- Alternate layers of the pudding with layers of:
- Your favorite yogurt (Greek yogurt, coconut yogurt for a vegan option)
- Crunchy granola or toasted nuts
- Fresh blueberries or other berries
- This method is perfect for a portable, grab-and-go breakfast that looks as good as it tastes.
- The Abundant Breakfast Bowl:
- Scoop the chia pudding into a wide, shallow bowl.
- Create sections on top with a variety of toppings for a beautiful “Buddha bowl” effect.
- A Universe of Topping Ideas:
- Fresh Fruit: Go beyond blueberries! Sliced bananas, fresh raspberries, sliced strawberries, or pomegranate seeds add color and flavor.
- The Crunch Factor: A sprinkle of granola, toasted sliced almonds, chopped pecans, pumpkin seeds, or hemp hearts adds essential texture.
- A Creamy Dollop: A spoonful of Greek yogurt, coconut cream, or a drizzle of almond butter or cashew butter adds richness.
- Sweet Finishes: A light drizzle of extra maple syrup, a sprinkle of toasted coconut flakes, or a dash of cinnamon.
- A Pop of Zest: A little bit of lemon zest grated over the top can brighten all the flavors and make the blueberry taste even more vibrant.
5 Additional Tips for Pudding Perfection
Master these simple tips to ensure your chia pudding is perfect every single time.
- The Double Whisk is Non-Negotiable: We mentioned it in the instructions, but it’s worth repeating as it’s the single most important tip. Chia seeds have a tendency to clump together and sink to the bottom. Whisking thoroughly right after mixing, and then again after letting it sit for 5-10 minutes, guarantees that the seeds are evenly suspended throughout the liquid. This ensures a consistent, creamy texture from top to bottom.
- Nail Your Ideal Consistency: The standard ratio is 1/4 cup of chia seeds to 1 cup of liquid. This creates a thick but spoonable pudding. However, you can easily adjust this to your personal preference.
- For a Thicker Pudding: Use a little less milk (e.g., 3/4 cup) or add an extra tablespoon of chia seeds.
- For a Thinner Pudding: Use a bit more milk (e.g., 1 1/4 cups).
- To Fix It: If you wake up and your pudding is too thick, simply stir in a splash more milk until it reaches your desired consistency. If it’s too thin, stir in another teaspoon or two of chia seeds and let it sit in the fridge for another 30-60 minutes.
- Meal Prep for a Week of Easy Breakfasts: This recipe is a meal prepper’s dream. You can easily double or triple the recipe. Store the pudding in a large airtight container in the refrigerator, and it will stay fresh for up to 5 days. Each morning, just scoop out a serving into a bowl or jar and add your fresh toppings.
- For an Ultra-Smooth Texture, Blend It All: While many people love the tapioca-like texture of whole chia seeds, some find it unusual. If you prefer a completely smooth, traditional pudding consistency, simply add the chia seeds to the blender along with the milk and blueberries in Stage 1. Blend everything together until silky smooth, then pour into your container and chill as directed.
- Sweeten Smartly: The sweetness of your blueberries can vary. It’s always a good idea to start with less sweetener (e.g., 1 tablespoon of maple syrup) in the initial blend. You can always taste the pudding after it has chilled and stir in a little more sweetener if needed. This way, you can perfectly tailor it to your taste without accidentally making it too sweet.
Frequently Asked Questions (FAQ)
Here are answers to some of the most common questions about making Blueberry Chia Pudding.
1. Why didn’t my chia pudding get thick?
This is the most common issue and there are usually three culprits. First, the ratio of chia seeds to liquid might be off (too much liquid). Second, it might not have had enough time to chill and set; it really does need at least 4 hours. Third, your chia seeds might be old. Over time, chia seeds can lose their powerful ability to absorb liquid. If you’ve done everything else right and it’s still not setting, it might be time for a new bag of seeds.
2. Can I make this recipe with other fruits?
Absolutely! This recipe is a fantastic base for all sorts of fruit variations. You can easily swap the blueberries for the same amount of:
- Raspberries: For a tarter, vibrant pink pudding.
- Strawberries: For a classic, sweet flavor.
- Mango: For a tropical, super creamy version.
- Cherries: For a deep, rich flavor (be sure to use pitted cherries).
The method remains exactly the same: blend the fruit with the milk and then add the chia seeds.
3. Is it better to use fresh or frozen blueberries?
Both work wonderfully! If you’re using the blending method described in this recipe, it doesn’t matter at all. Frozen blueberries are often more affordable, available year-round, and are frozen at peak ripeness, so they are just as nutritious and flavorful. If you prefer to stir whole blueberries into the pudding instead of blending them, fresh blueberries might have a slightly better texture.
4. What is the best type of milk for chia pudding?
The “best” milk really comes down to personal preference for taste and texture.
- For the creamiest, most decadent pudding: Canned light or full-fat coconut milk is the winner.
- For a low-calorie option: Unsweetened almond milk or skim dairy milk are great choices.
- For a neutral, naturally creamy option: Unsweetened oat milk is fantastic.
Experiment with different types to find your personal favorite!
5. How long does chia pudding last in the fridge?
When stored in an airtight container, chia pudding will stay fresh and delicious in the refrigerator for up to 5 days. The pudding may thicken slightly more each day as the seeds continue to absorb any residual liquid. This makes it an ideal breakfast to prepare on a Sunday to have ready for the busy week ahead.
Blueberry Chia Pudding recipe
Ingredients
-
Chia Seeds: 1/4 cup. These tiny seeds are the star of the show. When submerged in liquid, they form a gel-like coating, which gives the pudding its signature thick texture. Both black and white chia seeds work equally well.
-
Unsweetened Milk of Choice: 1 cup. The type of milk you use will affect the final flavor and creaminess.
-
Unsweetened Almond Milk: A great low-calorie, neutral-flavored option.
-
Canned Light Coconut Milk: Creates an incredibly rich and creamy pudding with a subtle tropical flavor.
-
Oat Milk: Provides a naturally creamy texture and a slightly sweet taste.
-
Dairy Milk: A classic choice that also works perfectly.
-
-
Fresh or Frozen Blueberries: 1 cup. Blueberries are packed with antioxidants and provide natural sweetness and gorgeous color. If using frozen, there’s no need to thaw them first if you’re blending them into the pudding.
-
Pure Maple Syrup: 1-2 tablespoons, or to taste. This adds a clean, natural sweetness that complements the blueberries beautifully. You can also use honey (if not vegan), agave nectar, or a few drops of liquid stevia.
-
Vanilla Extract: 1/2 teaspoon. A small amount of pure vanilla extract enhances the other flavors and adds a warm, dessert-like quality.
-
Pinch of Salt: Just a tiny pinch. Salt is a flavor enhancer and it balances the sweetness, making the overall taste more complex and delicious.
Instructions
Stage 1: Create the Blueberry Milk Base
This step ensures the blueberry flavor is infused throughout the entire pudding, not just dotted within it.
-
Combine Ingredients: In a blender, add the 1 cup of milk, 1 cup of blueberries, 1-2 tablespoons of maple syrup, 1/2 teaspoon of vanilla extract, and a small pinch of salt.
-
Blend Until Smooth: Blend on high speed for 30-60 seconds, or until the mixture is completely smooth and a beautiful, vibrant purple color. There should be no large pieces of blueberry skin remaining.
Stage 2: Mix and Chill
This is where the magic happens.
-
Combine and Whisk: Pour the blended blueberry milk into a medium-sized bowl or a large mason jar (at least 16 ounces). Add the 1/4 cup of chia seeds. Whisk vigorously for about one minute to fully combine everything and ensure there are no clumps of chia seeds.
-
The First Rest (The Anti-Clump Step): Let the mixture sit on the counter for 5-10 minutes. During this time, the chia seeds will begin to absorb the liquid and start the gelling process.
-
The Second Whisk: After the initial rest, give the pudding another very thorough whisk. You will notice it has already started to thicken slightly. This second whisk is the secret to preventing the chia seeds from settling at the bottom and creating a perfectly uniform, clump-free pudding.
-
Chill to Perfection: Cover the bowl or seal the jar and place it in the refrigerator to chill for at least 4 hours. For the best, thickest texture, let it chill overnight (6-8 hours). During this time, the chia seeds will fully absorb the liquid and transform the mixture into a thick, creamy pudding.
Nutrition
- Serving Size: one normal portion
- Calories: 250-300