")


There are certain flavors that are simply woven into the fabric of our memories, tastes that transport us back to simpler times, to celebrations and comfort. For me, Classic Yellow Cake is one of those flavors. It’s the taste of childhood birthdays, of potlucks and picnics, of grandma’s kitchen filled with the warm, inviting aroma of baking. It’s a cake that’s unpretentious yet utterly satisfying, a blank canvas for countless frostings and decorations, but equally delightful enjoyed plain with just a dusting of powdered sugar. Over the years, I’ve baked countless yellow cakes, each attempt a little closer to capturing that perfect balance of moistness, tenderness, and that quintessential buttery, vanilla-kissed flavor. This recipe is the culmination of those baking adventures – a reliable, foolproof guide to creating a Classic Yellow Cake that will become a beloved staple in your own kitchen. Whether you’re a seasoned baker or just starting out, this recipe is designed to be approachable and rewarding, delivering a cake that’s not just delicious, but also evokes that warm, comforting feeling of home-baked goodness. Prepare to be charmed by the simple elegance and timeless appeal of Classic Yellow Cake!
Ingredients: The Foundation of a Perfectly Tender Classic Yellow Cake
The secret to a truly exceptional Classic Yellow Cake lies in the quality and balance of its ingredients. Each component plays a crucial role in creating the cake’s signature texture, flavor, and golden hue. Here’s a detailed breakdown of what you’ll need to gather to bake your own masterpiece:
- Unsalted Butter: 1 cup (2 sticks), softened to room temperature. Butter is the heart of a Classic Yellow Cake, providing richness, moisture, and that melt-in-your-mouth tenderness. Unsalted butter allows you to control the overall salt level in the cake. Ensure it’s properly softened – it should be pliable but not greasy, allowing it to cream smoothly with the sugar.
- Granulated Sugar: 1 ¾ cups. Sugar not only provides sweetness but also contributes to the cake’s tenderness and moisture. Granulated sugar is the standard choice for yellow cake, providing a clean sweetness that complements the butter and vanilla.
- Large Eggs: 3 large, at room temperature. Eggs are essential for structure, richness, and moisture in cakes. They bind the ingredients together and contribute to the cake’s rise and tender crumb. Using room temperature eggs helps them emulsify more easily into the batter, resulting in a smoother and more cohesive cake.
- Vanilla Extract: 2 teaspoons, pure vanilla extract. Vanilla extract is the quintessential flavoring for Classic Yellow Cake, enhancing its sweetness and adding a warm, inviting aroma. Pure vanilla extract provides the best and most authentic vanilla flavor. Avoid imitation vanilla, which can taste artificial.
- All-Purpose Flour: 3 cups, measured correctly. Flour provides the structure for the cake. All-purpose flour is the standard choice and provides a good balance of gluten development for a tender yet sturdy cake. Measure your flour correctly using the spoon and level method (spoon flour into the measuring cup and level off the excess with a straight edge) to avoid adding too much flour, which can result in a dry cake.
- Baking Powder: 3 ½ teaspoons. Baking powder is the leavening agent that makes the cake rise and become light and airy. Ensure your baking powder is fresh (check the expiration date) for optimal leavening power.
- Salt: ¾ teaspoon, fine sea salt or table salt. Salt enhances the flavors of all the other ingredients in the cake, balancing the sweetness and bringing out the buttery and vanilla notes.
- Whole Milk: 1 cup, at room temperature. Milk adds moisture to the cake and helps to create a tender crumb. Whole milk provides the best richness and flavor, but you can use 2% milk if preferred. Using room temperature milk prevents it from chilling the batter and helps maintain a smooth emulsion.
Ingredient Notes and Best Practices for Baking Success:
- Room Temperature Ingredients are Key: Pay close attention to using room temperature butter, eggs, and milk. This is crucial for proper creaming of the butter and sugar, emulsifying the eggs into the batter, and ensuring all ingredients blend together smoothly. Room temperature ingredients create a more stable emulsion, resulting in a better cake texture.
- Measure Flour Accurately: Incorrectly measured flour is a common culprit for dry cakes. Always measure flour using the spoon and level method, or ideally, use a kitchen scale for the most accurate measurement. Too much flour will result in a dry, dense cake.
- Fresh Baking Powder: Baking powder loses its potency over time. Using fresh baking powder ensures proper leavening and a light, airy cake.
- High-Quality Vanilla Extract: Invest in a good quality pure vanilla extract for the best flavor. The vanilla flavor is prominent in Classic Yellow Cake, so using a high-quality extract makes a noticeable difference.
- Butter vs. Oil (Butter is Best for Classic Yellow Cake): While some yellow cake recipes use oil for moisture, butter is traditionally used in Classic Yellow Cake for its superior flavor and richness. Butter contributes to the cake’s signature buttery taste and tender crumb. Oil can result in a moister cake, but it lacks the depth of flavor that butter provides in this classic recipe.
- Milk Alternatives (for Dietary Needs): If you need a dairy-free option, unsweetened almond milk, soy milk, or oat milk can be used as substitutes for whole milk. The texture and flavor may be slightly altered, but these are good alternatives for dietary restrictions.
Instructions: Baking Your Perfect Classic Yellow Cake – Step-by-Step
Now that you have all your ingredients prepped and ready, let’s embark on the delightful journey of baking your Classic Yellow Cake. Follow these step-by-step instructions for baking success:
- Preheat Oven and Prepare Cake Pans: Preheat your oven to 350°F (175°C). Grease and flour two 9-inch round cake pans. Alternatively, you can grease the pans and line the bottoms with parchment paper rounds for easier cake removal. Greasing and flouring (or using parchment paper) prevents the cake from sticking to the pans and ensures clean removal after baking. Set the prepared pans aside.
- Cream Butter and Sugar: In a large bowl (or the bowl of a stand mixer), cream together the softened butter and granulated sugar using an electric mixer (stand mixer or hand mixer) on medium speed until light and fluffy. This step is crucial for incorporating air into the batter, which contributes to the cake’s light and airy texture. Creaming should take about 3-5 minutes, until the mixture is pale yellow and noticeably fluffy.
- Incorporate Eggs, One at a Time, and Vanilla: Beat in the eggs one at a time, mixing well after each addition until fully incorporated. Adding eggs one at a time ensures they emulsify properly into the butter and sugar mixture, creating a smooth batter. Beat in the vanilla extract until combined.
- Whisk Dry Ingredients: In a separate medium bowl, whisk together the all-purpose flour, baking powder, and salt. Whisking ensures the baking powder and salt are evenly distributed throughout the flour, preventing pockets of leavening or saltiness in the cake.
- Alternate Dry and Wet Ingredients, Beginning and Ending with Dry: Gradually add the dry ingredients to the wet ingredients in three additions, alternating with the milk in two additions, beginning and ending with the dry ingredients. Start by adding about one-third of the dry ingredients to the butter-sugar mixture and mix on low speed until just combined. Then, add half of the milk and mix until just combined. Repeat with another third of the dry ingredients, then the remaining milk, and finally the last third of the dry ingredients, mixing until just combined after each addition. Mix only until just combined after each addition of dry and wet ingredients. Overmixing at this stage can develop the gluten in the flour, resulting in a tough cake.
- Final Mixing – Just Until Combined: Mix the batter on low speed until just combined and smooth. Scrape down the sides and bottom of the bowl with a spatula to ensure all ingredients are evenly incorporated. The batter should be smooth and creamy. Avoid overmixing at this stage.
- Divide Batter Evenly and Bake: Divide the batter evenly between the prepared cake pans. Use a kitchen scale for precise division if desired, or eyeball it as evenly as possible. Spread the batter evenly in the pans. Bake in the preheated oven for 30-35 minutes, or until a toothpick inserted into the center of a cake comes out clean and the cakes are lightly golden brown and spring back lightly when gently pressed in the center. Baking time may vary slightly depending on your oven, so start checking for doneness around 30 minutes.
- Cool in Pans, Then Invert: Let the cakes cool in the pans on a wire rack for 10-15 minutes. This allows the cakes to set slightly before inverting. Run a thin knife or offset spatula around the edges of the cake pans to loosen the cakes. Invert the cakes onto the wire rack to cool completely before frosting. Cooling completely is essential before frosting, otherwise the frosting will melt.
- Frost and Decorate (Once Completely Cooled): Once the cakes are completely cooled, they are ready to be frosted and decorated as desired. See the “How to Serve” section for frosting and decoration ideas.
Tips for Perfect Instructions:
- Proper Pan Preparation: Don’t skip greasing and flouring (or parchment paper). This is crucial for easy cake removal.
- Don’t Overmix: Overmixing is the enemy of a tender cake. Mix only until just combined after adding the dry and wet ingredients, especially in the later stages of batter preparation.
- Accurate Oven Temperature: Ensure your oven temperature is accurate. Use an oven thermometer to verify if needed. Oven temperature variations can significantly affect baking time and cake texture.
- Check for Doneness with Toothpick Test: The toothpick test is a reliable way to check for cake doneness. Insert a toothpick into the center; if it comes out clean or with just a few moist crumbs attached, the cake is done. If it comes out with wet batter, bake for a few more minutes and test again.
- Cool Completely Before Frosting: Patience is key! Ensure the cakes are completely cooled before frosting. Frosting a warm cake will cause the frosting to melt and slide off.
Nutrition Facts: A Sweet Treat in Moderation – Nutritional Overview
Classic Yellow Cake is a delightful treat, but like most cakes, it’s best enjoyed in moderation as part of a balanced diet. Here’s a general estimate of the nutrition facts per serving. Please note that these are approximations and can vary depending on specific ingredient brands, frosting choices, and serving sizes. These nutrition facts are for the cake itself, without frosting. Frosting will significantly increase calories, sugar, and fat content.
- Servings: This recipe typically yields 12-16 servings (slices), depending on how you cut the cake. Nutrition facts are estimated per slice (assuming 12 slices per cake).
- Calories per Serving (per slice, unfrosted): Approximately 300-350 calories. Yellow cake is moderately calorie-dense, primarily due to butter, sugar, and flour.
- Fat: Approximately 15-20 grams of fat per serving (unfrosted). The fat content comes primarily from butter and eggs. A significant portion of this fat is saturated fat from butter.
- Protein: Approximately 4-5 grams of protein per serving (unfrosted). Eggs and flour contribute to the protein content.
- Carbohydrates: Approximately 40-50 grams of carbohydrates per serving (unfrosted). Sugar and flour are the main sources of carbohydrates.
- Sugar: Approximately 25-30 grams of sugar per serving (unfrosted). Granulated sugar is the primary source of sugar.
- Sodium: Approximately 150-200mg of sodium per serving (unfrosted). Sodium comes from salt and baking powder.
- Cholesterol: Approximately 70-80mg of cholesterol per serving (unfrosted). Cholesterol comes from egg yolks and butter.
Nutritional Considerations:
- High in Calories, Fat, and Sugar: Classic Yellow Cake is relatively high in calories, fat (especially saturated fat), and sugar. It is an indulgent dessert and should be consumed in moderation.
- Not a Significant Source of Vitamins or Minerals: While it contains some protein and trace amounts of minerals, Classic Yellow Cake is not a significant source of essential vitamins or minerals. It is primarily a source of energy (calories) and enjoyment.
- Frosting Adds Significantly to Nutritional Values: Keep in mind that frosting will substantially increase the calorie, fat, sugar, and potentially sodium content of the finished cake. The nutritional values provided here are for the unfrosted cake only.
- Enjoy in Moderation: Like most desserts, Classic Yellow Cake is best enjoyed as an occasional treat rather than an everyday staple. Portion control is important.
Making it Slightly Healthier (Possible Modifications, but will alter classic cake):
- Reduce Sugar (Slightly): You can reduce the sugar slightly (by about ¼ cup) without drastically affecting the cake’s texture, although it will be less sweet.
- Whole Wheat Pastry Flour (Partial Substitution): You can substitute up to ⅓ of the all-purpose flour with whole wheat pastry flour for a slight increase in fiber, but this will make the cake slightly denser.
- Serve with Fresh Fruit: Pairing the cake with fresh fruit can add some vitamins, minerals, and fiber to the dessert experience, and can balance the sweetness of the cake.
Nutritional Disclaimer: These nutrition facts are estimates. For precise nutritional information, use online recipe analyzers or nutrition tracking apps, inputting the specific brands and quantities of ingredients you use and your chosen preparation methods (including frosting, if applicable).
Preparation Time: From Pantry to Oven – Time Breakdown
Baking a Classic Yellow Cake is a rewarding process that doesn’t require an excessive amount of time, especially with good organization. Here’s a breakdown of the preparation and baking times:
- Prep Time: Approximately 20-25 minutes. This includes:
- Softening butter and bringing eggs and milk to room temperature (inactive time, but factor in advance)
- Greasing and flouring cake pans (5 minutes)
- Measuring out all ingredients (10-15 minutes)
- Whisking dry ingredients (2-3 minutes)
- Creaming butter and sugar (3-5 minutes)
- Adding eggs and vanilla (2-3 minutes)
- Bake Time: 30-35 minutes.
- Cooling Time: 1-2 hours (for complete cooling before frosting). Active cooling time is minimal, but allow sufficient time for cakes to cool completely.
- Total Time (Active): Approximately 50-60 minutes (active hands-on time).
- Total Time (Including Cooling): Approximately 1 hour 50 minutes to 2 hours 35 minutes (including active and inactive cooling time).
Time-Saving Tips (to streamline the process):
- Mise en Place (Prep Ahead): Have all your ingredients measured out and prepped before you start mixing. This significantly speeds up the active mixing process.
- Use a Stand Mixer (if available): A stand mixer makes creaming butter and sugar and mixing the batter much faster and easier than using a hand mixer or mixing by hand.
- Parchment Paper Rounds: Using parchment paper rounds in the bottom of the cake pans makes cake removal quicker and easier, potentially saving a few minutes on pan preparation.
- Make Frosting While Cake Cools: Prepare your frosting while the cakes are cooling. This utilizes the cooling time efficiently.
- Simple Frosting: Opt for a simple frosting like a basic vanilla buttercream if you want to minimize frosting time.
How to Serve: From Simple Elegance to Festive Celebrations – Serving Ideas
Classic Yellow Cake is incredibly versatile and can be served in countless ways, from simple everyday desserts to elaborate celebration cakes. Here are various serving suggestions to inspire you:
Frosting Options (The Perfect Complement):
- Classic Vanilla Buttercream: The quintessential pairing for Yellow Cake. A smooth, creamy vanilla buttercream frosting enhances the vanilla notes in the cake and provides a perfect sweet contrast.
- Chocolate Buttercream: Rich and decadent, chocolate buttercream frosting adds a delightful chocolatey dimension to Yellow Cake, creating a classic flavor combination.
- Cream Cheese Frosting: Tangy and slightly less sweet than buttercream, cream cheese frosting provides a lovely counterpoint to the sweetness of the Yellow Cake and adds a creamy texture.
- Lemon Buttercream: Bright and citrusy, lemon buttercream frosting adds a refreshing zing that complements the buttery richness of Yellow Cake, especially nice for spring and summer.
- Peanut Butter Buttercream: For peanut butter lovers, a peanut butter buttercream frosting creates a fun and indulgent flavor combination.
- Simple Glaze: For a less sweet and lighter option, a simple vanilla glaze or lemon glaze drizzled over the cake is elegant and delicious.
- Whipped Cream and Berries: Serve slices of Yellow Cake with a dollop of freshly whipped cream and a scattering of fresh berries (strawberries, raspberries, blueberries) for a lighter and more fruit-forward dessert.
Serving Occasions:
- Birthday Cakes: Classic Yellow Cake is a perfect base for birthday cakes. Decorate with colorful buttercream frosting, sprinkles, candles, and birthday decorations.
- Everyday Dessert: Enjoy slices of Yellow Cake as a simple and satisfying everyday dessert, either unfrosted, dusted with powdered sugar, or with a simple glaze or whipped cream.
- Potlucks and Picnics: Yellow Cake is easy to transport and serve, making it a great choice for potlucks, picnics, and gatherings.
- Holiday Celebrations: Yellow Cake can be adapted for various holidays. For example, decorate with festive sprinkles for holidays like Christmas, Easter, or Fourth of July.
- Afternoon Tea or Coffee: Serve slices of Yellow Cake as a delightful accompaniment to afternoon tea or coffee.
Garnish and Decoration Ideas (Enhance Visual Appeal):
- Sprinkles: Colorful sprinkles are a classic and festive decoration for Yellow Cake, especially for birthdays.
- Fresh Fruit: Arrange fresh berries, sliced peaches, or other fruits on top of the frosting for a beautiful and fresh garnish.
- Chocolate Shavings or Curls: Chocolate shavings or curls add elegance and a chocolatey touch.
- Chopped Nuts: Toasted chopped nuts (pecans, walnuts, almonds) add texture and nutty flavor.
- Candied Citrus Peel: Candied orange or lemon peel adds a sophisticated touch and citrusy aroma.
- Edible Flowers: Edible flowers add a delicate and beautiful floral garnish.
- Simple Swirls or Rosettes of Frosting: Use a piping bag and tips to create simple swirls or rosettes of frosting for an elegant and classic look.
- Layer Cake with Filling: Turn the two cake layers into a layer cake by adding a filling between the layers, such as fruit preserves, pastry cream, or extra frosting.
Serving Accompaniments:
- Ice Cream: Serve slices of warm or room temperature Yellow Cake with a scoop of vanilla ice cream, chocolate ice cream, or strawberry ice cream for a classic dessert pairing.
- Whipped Cream: A dollop of freshly whipped cream provides a light and airy accompaniment.
- Coffee or Tea: Serve with coffee, tea, milk, or other beverages.
Presentation Matters: Even simple decorations can make your Classic Yellow Cake look more inviting. A dusting of powdered sugar, a scattering of sprinkles, or a few fresh berries can elevate the presentation effortlessly.
Additional Tips for Classic Yellow Cake Perfection: Baking Wisdom
Want to consistently bake Classic Yellow Cake that is moist, tender, and utterly delicious? Here are five additional tips to ensure baking success every time:
- Use Room Temperature Ingredients – Really! While it’s been mentioned before, it’s worth emphasizing again: room temperature butter, eggs, and milk are essential for Classic Yellow Cake. Room temperature butter creams smoothly with sugar, creating air pockets for a light cake. Room temperature eggs emulsify better into the batter, and room temperature milk prevents chilling the batter and helps maintain a smooth emulsion. Plan ahead and take your ingredients out of the refrigerator at least 30-60 minutes before baking.
- Don’t Overmix the Batter – Gentle is Key: Overmixing the batter, especially after adding the flour, develops the gluten in the flour too much, resulting in a tough, dense cake instead of a tender one. Mix only until just combined after adding the dry and wet ingredients. A few streaks of flour are okay; they will disappear during baking. Gentle mixing is key to a tender crumb.
- Check Oven Temperature with an Oven Thermometer: Oven temperatures can vary, even if your oven dial is set to a specific temperature. Use an oven thermometer to verify your oven temperature and ensure it’s accurately preheated to 350°F (175°C). Baking at the correct temperature is crucial for even baking and proper cake texture.
- Prepare Cake Pans Properly and Consider Parchment: Thoroughly greasing and flouring your cake pans is essential to prevent sticking and ensure easy cake removal. For extra insurance, consider using parchment paper rounds in the bottom of the pans in addition to greasing. This makes cake removal virtually foolproof and prevents sticking, especially for delicate cakes.
- Let Cakes Cool Completely Before Frosting – Patience Pays Off: Resist the temptation to frost the cakes while they are still warm. Frosting a warm cake will cause the frosting to melt, slide off, and potentially make the cake soggy. Allow the cakes to cool completely on a wire rack before frosting and decorating. Patience is key to achieving a beautifully frosted cake.
Bonus Tip: For an even more tender cake, consider using cake flour instead of all-purpose flour. Cake flour has a lower protein content, which results in a more tender crumb. If using cake flour, substitute it measure-for-measure for the all-purpose flour in the recipe.
FAQ: Your Classic Yellow Cake Questions Answered – Baking Insights
Got baking questions about Classic Yellow Cake? Here are answers to some frequently asked questions to help you troubleshoot and perfect your baking skills:
Q1: Can I make this cake ahead of time? How should I store it?
A1: Yes, you can definitely make Classic Yellow Cake ahead of time!
- Unfrosted Cake: Unfrosted cake layers can be stored at room temperature, tightly wrapped in plastic wrap, for up to 2-3 days. You can also store them in an airtight container at room temperature.
- Frosted Cake: Frosted cake should be stored in the refrigerator due to the buttercream frosting. Store in an airtight container or cake carrier in the refrigerator for up to 3-4 days.
- Freezing Cake Layers: For longer storage, you can freeze unfrosted cake layers. Wrap each layer tightly in plastic wrap, then in foil, and freeze for up to 2-3 months. Thaw overnight in the refrigerator before frosting.
Q2: Can I double this recipe to make a larger cake or a sheet cake?
A2: Yes, you can easily double this recipe.
- Larger Round Cake: Doubling the recipe will make enough batter for a 3-layer 9-inch round cake or a taller 2-layer cake. You may need to increase baking time slightly.
- Sheet Cake: For a 9×13 inch sheet cake, doubling the recipe is usually sufficient. Baking time for a sheet cake will typically be shorter, around 25-30 minutes, so start checking for doneness earlier.
Q3: Can I make cupcakes with this recipe?
A3: Yes, this recipe works beautifully for cupcakes!
- Cupcake Baking Time: Fill cupcake liners about ¾ full and bake at 350°F (175°C) for 18-22 minutes, or until a toothpick inserted into the center comes out clean.
- Yield: This recipe should yield approximately 24-30 cupcakes, depending on how full you fill the liners.
Q4: Can I use oil instead of butter in this recipe?
A4: While butter is traditional and recommended for Classic Yellow Cake, you can substitute with oil if needed, but it will slightly alter the flavor and texture.
- Texture Difference: Oil will result in a moister cake, but it may lack the richness and tender crumb that butter provides.
- Flavor Difference: The cake will lose some of the signature buttery flavor of Classic Yellow Cake.
- Suitable Oils: Use a neutral-flavored oil like canola oil, vegetable oil, or grapeseed oil. Substitute oil measure-for-measure for the butter (1 cup of oil for 1 cup of butter).
For the most authentic Classic Yellow Cake flavor and texture, butter is highly recommended.
Q5: Why is my cake dry? What are common causes of dry cake?
A5: Dry cake is a common baking frustration. Here are some common causes and how to avoid them:
- Overbaking: Overbaking is the most frequent cause of dry cake. Bake only until a toothpick inserted into the center comes out clean. Don’t overbake to be “sure” it’s done.
- Too Much Flour: Incorrectly measured flour (using too much) is another common culprit. Always measure flour accurately using the spoon and level method or a kitchen scale.
- Not Enough Fat: Not using enough butter or oil (or using a lower-fat substitute incorrectly) can result in a dry cake. Follow the recipe measurements accurately.
- Oven Too Hot: Baking at too high of a temperature can cause the cake to dry out quickly. Ensure your oven temperature is accurate.
- Overmixing: Overmixing the batter, especially after adding flour, can develop gluten and lead to a tougher, drier cake. Mix gently and only until just combined.
By paying attention to these potential causes, you can bake moist and delicious Classic Yellow Cake every time!
Still have baking questions? Don’t hesitate to ask in the comments below! I’m here to help you bake the perfect Classic Yellow Cake!
Classic Yellow Cake is more than just a dessert; it’s a timeless classic that embodies comfort, simplicity, and pure baking joy. It’s a cake that welcomes endless variations and personal touches, yet remains perfectly satisfying in its most basic form. With this recipe and guide, you’re now ready to create your own batch of Classic Yellow Cake, fill your kitchen with its warm, inviting aroma, and share its deliciousness with loved ones. Enjoy the simple pleasure of baking and savoring this truly iconic cake!
Print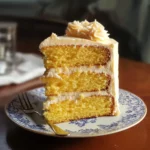
Classic Yellow Cake recipe
Ingredients
- Unsalted Butter: 1 cup (2 sticks), softened to room temperature. Butter is the heart of a Classic Yellow Cake, providing richness, moisture, and that melt-in-your-mouth tenderness. Unsalted butter allows you to control the overall salt level in the cake. Ensure it’s properly softened – it should be pliable but not greasy, allowing it to cream smoothly with the sugar.
- Granulated Sugar: 1 ¾ cups. Sugar not only provides sweetness but also contributes to the cake’s tenderness and moisture. Granulated sugar is the standard choice for yellow cake, providing a clean sweetness that complements the butter and vanilla.
- Large Eggs: 3 large, at room temperature. Eggs are essential for structure, richness, and moisture in cakes. They bind the ingredients together and contribute to the cake’s rise and tender crumb. Using room temperature eggs helps them emulsify more easily into the batter, resulting in a smoother and more cohesive cake.
- Vanilla Extract: 2 teaspoons, pure vanilla extract. Vanilla extract is the quintessential flavoring for Classic Yellow Cake, enhancing its sweetness and adding a warm, inviting aroma. Pure vanilla extract provides the best and most authentic vanilla flavor. Avoid imitation vanilla, which can taste artificial.
- All-Purpose Flour: 3 cups, measured correctly. Flour provides the structure for the cake. All-purpose flour is the standard choice and provides a good balance of gluten development for a tender yet sturdy cake. Measure your flour correctly using the spoon and level method (spoon flour into the measuring cup and level off the excess with a straight edge) to avoid adding too much flour, which can result in a dry cake.
- Baking Powder: 3 ½ teaspoons. Baking powder is the leavening agent that makes the cake rise and become light and airy. Ensure your baking powder is fresh (check the expiration date) for optimal leavening power.
- Salt: ¾ teaspoon, fine sea salt or table salt. Salt enhances the flavors of all the other ingredients in the cake, balancing the sweetness and bringing out the buttery and vanilla notes.
- Whole Milk: 1 cup, at room temperature. Milk adds moisture to the cake and helps to create a tender crumb. Whole milk provides the best richness and flavor, but you can use 2% milk if preferred. Using room temperature milk prevents it from chilling the batter and helps maintain a smooth emulsion.
Instructions
- Preheat Oven and Prepare Cake Pans: Preheat your oven to 350°F (175°C). Grease and flour two 9-inch round cake pans. Alternatively, you can grease the pans and line the bottoms with parchment paper rounds for easier cake removal. Greasing and flouring (or using parchment paper) prevents the cake from sticking to the pans and ensures clean removal after baking. Set the prepared pans aside.
- Cream Butter and Sugar: In a large bowl (or the bowl of a stand mixer), cream together the softened butter and granulated sugar using an electric mixer (stand mixer or hand mixer) on medium speed until light and fluffy. This step is crucial for incorporating air into the batter, which contributes to the cake’s light and airy texture. Creaming should take about 3-5 minutes, until the mixture is pale yellow and noticeably fluffy.
- Incorporate Eggs, One at a Time, and Vanilla: Beat in the eggs one at a time, mixing well after each addition until fully incorporated. Adding eggs one at a time ensures they emulsify properly into the butter and sugar mixture, creating a smooth batter. Beat in the vanilla extract until combined.
- Whisk Dry Ingredients: In a separate medium bowl, whisk together the all-purpose flour, baking powder, and salt. Whisking ensures the baking powder and salt are evenly distributed throughout the flour, preventing pockets of leavening or saltiness in the cake.
- Alternate Dry and Wet Ingredients, Beginning and Ending with Dry: Gradually add the dry ingredients to the wet ingredients in three additions, alternating with the milk in two additions, beginning and ending with the dry ingredients. Start by adding about one-third of the dry ingredients to the butter-sugar mixture and mix on low speed until just combined. Then, add half of the milk and mix until just combined. Repeat with another third of the dry ingredients, then the remaining milk, and finally the last third of the dry ingredients, mixing until just combined after each addition. Mix only until just combined after each addition of dry and wet ingredients. Overmixing at this stage can develop the gluten in the flour, resulting in a tough cake.
- Final Mixing – Just Until Combined: Mix the batter on low speed until just combined and smooth. Scrape down the sides and bottom of the bowl with a spatula to ensure all ingredients are evenly incorporated. The batter should be smooth and creamy. Avoid overmixing at this stage.
- Divide Batter Evenly and Bake: Divide the batter evenly between the prepared cake pans. Use a kitchen scale for precise division if desired, or eyeball it as evenly as possible. Spread the batter evenly in the pans. Bake in the preheated oven for 30-35 minutes, or until a toothpick inserted into the center of a cake comes out clean and the cakes are lightly golden brown and spring back lightly when gently pressed in the center. Baking time may vary slightly depending on your oven, so start checking for doneness around 30 minutes.
- Cool in Pans, Then Invert: Let the cakes cool in the pans on a wire rack for 10-15 minutes. This allows the cakes to set slightly before inverting. Run a thin knife or offset spatula around the edges of the cake pans to loosen the cakes. Invert the cakes onto the wire rack to cool completely before frosting. Cooling completely is essential before frosting, otherwise the frosting will melt.
- Frost and Decorate (Once Completely Cooled): Once the cakes are completely cooled, they are ready to be frosted and decorated as desired. See the “How to Serve” section for frosting and decoration ideas.
Nutrition
- Serving Size: one normal portion
- Calories: 300-350
- Sugar: 25-30 grams
- Sodium: 150-200mg
- Fat: 15-20 grams
- Carbohydrates: 40-50 grams
- Protein: 4-5 grams
- Cholesterol: 70-80mg