")


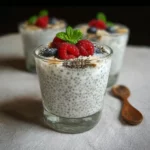
I used to think of healthy breakfasts as a chore, a box to be ticked off with something bland and joyless. My mornings were a frantic rush, often culminating in grabbing a granola bar that left me hungry an hour later. Then, I discovered the magic of Coconut Milk Chia Pudding, and my entire breakfast routine was revolutionized. The first time I made it, I was skeptical. How could these tiny, bird-like seeds transform into anything resembling a treat? I mixed the simple ingredients in a jar, gave it a shake, and left it in the fridge overnight with little expectation. The next morning, I was greeted with a thick, luscious, impossibly creamy pudding. It had the texture of a decadent tapioca or a rich panna cotta, but was packed with nutrients that kept me full and energized all morning. It felt like I was eating dessert for breakfast, a guilt-free indulgence that was both incredibly delicious and ridiculously easy. It has since become the cornerstone of my meal-prep routine, a blank canvas for endless toppings that brings a moment of calm, delicious luxury to even the busiest of days.
The Ultimate Creamy Coconut Milk Chia Pudding: Ingredients
The beauty of this recipe lies in its simplicity and the quality of its components. While there are only a handful of ingredients, each one is chosen specifically to contribute to the perfect balance of flavor, texture, and nutritional value. Understanding the role of each ingredient will help you master this versatile dish.
The Core Recipe (for 2 generous servings):
- Full-Fat Canned Coconut Milk: 1 can (13.5 ounces / 400ml). This is the non-negotiable secret to an ultra-creamy, rich, and decadent chia pudding. The high-fat content creates a luxurious, dessert-like texture that lighter milks simply cannot replicate. Look for a brand with minimal additives, ideally just coconut and water. Shake the can vigorously before opening to combine the separated cream and water.
- Black or White Chia Seeds: ¼ cup (about 4 tablespoons). These tiny seeds are the magicians of the recipe. They are hydrophilic, meaning they can absorb over ten times their weight in liquid, creating the signature gel-like consistency of the pudding. There is no nutritional difference between black and white chia seeds; the choice is purely aesthetic.
- Pure Maple Syrup: 2-3 tablespoons, or to taste. This provides a clean, natural sweetness that pairs beautifully with coconut. You can also use honey (if not strictly vegan), agave nectar, or a few drops of liquid stevia for a sugar-free option. The sweetness can always be adjusted, so start with less and add more if needed.
- Pure Vanilla Extract: 1 teaspoon. Do not underestimate the power of vanilla. It adds a crucial layer of warmth and depth, elevating the pudding from a simple “health food” to a genuinely delicious treat. It bridges the flavors of the coconut and the sweetener.
- Pinch of Fine Sea Salt: About ⅛ teaspoon. Salt in a sweet dish might seem counterintuitive, but it is essential. A small pinch doesn’t make the pudding salty; it enhances the sweetness, balances the richness of the coconut milk, and makes all the other flavors pop.
Step-by-Step Instructions for Flawless Chia Pudding
The process for making chia pudding is famously simple, but following these specific steps, particularly the “second stir,” is the key to avoiding clumps and achieving a perfectly smooth, homogenous texture every single time.
- Choose Your Vessel: Select a container with a tight-fitting lid, such as a large mason jar (quart-sized is ideal) or a medium-sized bowl that you can cover securely with plastic wrap. A jar is highly recommended as it makes the mixing process incredibly easy.
- Combine All Ingredients (The First Mix): In your chosen jar or bowl, combine the full-fat canned coconut milk, the ¼ cup of chia seeds, your desired amount of maple syrup, the vanilla extract, and the pinch of salt.
- The Initial, Vigorous Mix: Secure the lid on your jar and shake it vigorously for a full 30-45 seconds, as if you were shaking a cocktail. If using a bowl, use a small whisk to stir everything together energetically for at least a minute. Your goal is to ensure every single chia seed is coated in liquid and fully dispersed. This initial mix is the first line of defense against clumping.
- The First Rest: Let the mixture rest on the counter for 5 to 10 minutes. During this time, the chia seeds will begin to absorb the coconut milk and start their gelling process.
- The Crucial Second Stir (The Anti-Clump Secret): This is the most important step for perfectly smooth chia pudding. After the 10-minute rest, you will notice that the chia seeds have begun to clump together and settle. Open the jar and give it another very vigorous shake, or whisk it thoroughly again. This second stir breaks up any forming clumps and redistributes the seeds, guaranteeing a smooth, consistent texture throughout the final pudding. Do not skip this step!
- The Overnight Chill: Once you’ve completed the second stir, secure the lid and place the pudding in the refrigerator. Let it chill for at least 4 hours, but for the best and thickest results, let it set overnight (8-12 hours). During this time, the chia seeds will fully hydrate and absorb the liquid, transforming the mixture into a thick, spoonable pudding.
- Check and Serve: The next morning, open the jar and give the pudding a final stir. It should be thick, creamy, and luscious. If it seems a little too thick for your liking, you can stir in a splash of extra coconut milk or another milk of your choice to loosen it. Serve chilled with your favorite toppings.
Nutrition Facts
- Servings: 2
- Calories per serving: Approximately 450-500 kcal (without toppings)
Disclaimer: The nutritional information provided is a careful estimate. It can vary based on the specific brand of coconut milk used (fat content can differ) and the amount and type of sweetener added.
Beyond the calories, the true nutritional story of this pudding is its incredible health profile. It’s a powerhouse of nutrients disguised as a creamy treat.
- Fiber Powerhouse: A single serving of this pudding can provide over 10 grams of fiber, which is fantastic for digestive health, promoting regularity, and keeping you feeling full and satisfied for hours.
- Rich in Omega-3s: Chia seeds are one of the best plant-based sources of ALA (alpha-linolenic acid), a type of omega-3 fatty acid that is crucial for brain health and reducing inflammation.
- Healthy Fats: The full-fat coconut milk provides medium-chain triglycerides (MCTs), a type of healthy fat that is easily digested and can be used by the body for energy.
- Plant-Based Protein: While not a high-protein food on its own, chia seeds do provide a complete protein, containing all nine essential amino acids, which helps with satiety and muscle maintenance.
Preparation Time
- Active Preparation Time: 5 minutes
- Inactive Chill Time: 4 hours minimum, overnight recommended (8+ hours)
- Total Time: Approximately 8 hours 5 minutes
How to Serve Your Coconut Milk Chia Pudding
This is where the fun truly begins. Coconut milk chia pudding is a wonderfully neutral and creamy canvas, ready to be adorned with a limitless variety of textures and flavors. Think of it as a healthy yogurt parfait or a bowl of oatmeal, and get creative!
The Ultimate Topping Bar:
Setting out a variety of toppings allows for endless customization, making it a fun breakfast for the whole family.
- Fresh Fruit (for sweetness, color, and vitamins):
- Tropical Vibes: Diced mango, pineapple, passion fruit, or sliced banana.
- Berry Burst: Fresh raspberries, blueberries, blackberries, or sliced strawberries.
- Stone Fruit: Diced peaches, nectarines, plums, or cherries in the summer.
- The Crunch Factor (for essential texture):
- Nuts and Seeds: Toasted slivered almonds, chopped walnuts or pecans, shelled pistachios, pumpkin seeds (pepitas), or sunflower seeds.
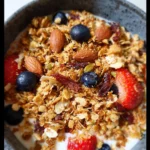
- Granola: Your favorite store-bought or homemade granola for a classic parfait experience.
- Toasted Coconut Flakes: This doubles down on the coconut flavor and adds a delightful, crispy texture.
- Drizzles and Swirls (for extra flavor and richness):
- Nut Butter: A spoonful of almond butter, peanut butter, or cashew butter swirled in.
- Jam or Fruit Compote: A dollop of your favorite jam or a simple homemade berry compote.
- Extra Sweetness: A final drizzle of maple syrup or honey.
- Spices and Superfoods:
- Spices: A sprinkle of cinnamon, cardamom, nutmeg, or turmeric.
- Superfoods: A dusting of cacao powder, matcha powder, or a sprinkle of bee pollen.
Presentation Ideas:
- The Layered Parfait: In a clear glass or jar, create beautiful layers. Start with a layer of chia pudding, followed by a layer of granola, a layer of fresh fruit, and repeat. This is perfect for a grab-and-go breakfast or an elegant presentation for guests.
- The Loaded Bowl: Spoon the pudding into a wide, shallow bowl. Artfully arrange your toppings in neat rows or a beautiful medley on top, similar to how you would prepare a smoothie bowl.
Additional Tips for Pudding Perfection
Master these five pro tips to ensure your chia pudding is flawless every single time and to learn how to adapt it to your exact preferences.
- The Golden Ratio is Key (But Adjustable): The standard, tried-and-true ratio for a thick and creamy pudding is 1 part chia seeds to 4 parts liquid (e.g., ¼ cup chia seeds to 1 cup milk). If you prefer a slightly thinner, more drinkable consistency, you can adjust the ratio to 1 part chia to 5 parts liquid. If you want an extra-thick, almost solid pudding, you can reduce it to 1 part chia to 3 parts liquid. This base ratio is your key to customization.
- Achieve Ultimate Smoothness: If you are someone who is sensitive to the “tapioca-like” texture of whole chia seeds, you can create a completely smooth, mousse-like pudding. After the pudding has fully chilled and set overnight, simply transfer it to a high-speed blender and blend for 30-60 seconds until silky smooth. This method is also a great way to salvage a clumpy batch if you forgot the second stir.
- Mastering Meal Prep: Chia pudding is a meal prepper’s dream. You can make a large batch (doubling or tripling this recipe) on a Sunday. After the pudding has fully set, portion it out into individual single-serving jars or containers. This way, you have a healthy, delicious breakfast ready to grab and go for the entire week. The pudding will stay fresh and delicious for up to 5 days in the refrigerator.
- Infuse Flavor from the Start: Don’t limit your flavor additions to just toppings. You can build incredible depth by infusing flavors directly into the base mixture. Before you chill the pudding, whisk in one of these additions:
- Chocolate: Add 2 tablespoons of unsweetened cocoa or cacao powder for a rich chocolate pudding.
- Matcha: Add 1-2 teaspoons of culinary-grade matcha powder for a vibrant green tea version.
- Spices: Add ½ teaspoon of ground cinnamon, cardamom, or pumpkin pie spice for a warming flavor.
- Fruit Puree: Whisk in ¼ cup of fruit puree, like mango or raspberry, for a pudding that is fruity through and through.
- Sweeten at the End for Perfect Control: While the recipe calls for adding sweetener at the beginning, an alternative method is to make the base unsweetened. Let the unsweetened pudding set overnight. Then, when you are ready to serve, you can stir in your desired amount of maple syrup or other sweetener to taste. This is a great method if you are serving multiple people with different sweetness preferences or if you are trying to minimize your sugar intake, as the toppings will also add sweetness.
Frequently Asked Questions (FAQ)
Here are the answers to some of the most common questions about making homemade coconut milk chia pudding.
1. Why is my chia pudding runny and not thick?
A runny pudding is almost always due to one of two reasons: an incorrect ratio or not enough chilling time. First, double-check that you used the correct 1:4 ratio of chia seeds to liquid. Second, ensure you let it chill for at least 4 hours, and ideally overnight. The gelling process takes time. If it’s still runny after a full night in the fridge, you can simply stir in another tablespoon of chia seeds, give it a good mix, and let it chill for another couple of hours.
2. How do I fix lumpy or clumpy chia pudding?
Clumps happen when the chia seeds stick together before they have a chance to hydrate evenly. This is almost always because the crucial “second stir” was skipped. To fix a lumpy pudding, your best bet is to use a fork or a small whisk and stir it as vigorously as possible to break up the clumps. For a guaranteed fix, you can pour the lumpy pudding into a blender and blend for a few seconds until smooth.
3. Can I use a different type of milk besides canned coconut milk?
Yes, absolutely. You can make chia pudding with virtually any type of milk, including almond milk, oat milk, soy milk, cashew milk, or regular dairy milk. However, it is important to know that the final texture will be different. Full-fat canned coconut milk creates the richest, creamiest, and thickest result. Lighter milks, like almond milk or carton coconut milk, will produce a much thinner pudding. You may want to adjust your ratio to 1 part chia to 3 parts liquid if using a thinner milk.
4. How long does coconut milk chia pudding last in the refrigerator?
When stored in an airtight container, coconut milk chia pudding will stay fresh and delicious for up to 5 days in the refrigerator. It may thicken slightly more over time. If this happens, you can simply stir in a splash of milk to reach your desired consistency before serving.
5. I only have ground chia seeds. Can I use those instead?
Yes, you can use ground chia seeds (also known as chia meal). The pudding will set much faster, often within an hour, and will have a smoother, more uniform texture, similar to a traditional cornstarch pudding, without the distinct “tapioca-like” pearls. You can use the same ratio of ground chia to liquid as you would for whole seeds.
Coconut Milk Chia Pudding recipe
Ingredients
-
Full-Fat Canned Coconut Milk: 1 can (13.5 ounces / 400ml). This is the non-negotiable secret to an ultra-creamy, rich, and decadent chia pudding. The high-fat content creates a luxurious, dessert-like texture that lighter milks simply cannot replicate. Look for a brand with minimal additives, ideally just coconut and water. Shake the can vigorously before opening to combine the separated cream and water.
-
Black or White Chia Seeds: ¼ cup (about 4 tablespoons). These tiny seeds are the magicians of the recipe. They are hydrophilic, meaning they can absorb over ten times their weight in liquid, creating the signature gel-like consistency of the pudding. There is no nutritional difference between black and white chia seeds; the choice is purely aesthetic.
-
Pure Maple Syrup: 2-3 tablespoons, or to taste. This provides a clean, natural sweetness that pairs beautifully with coconut. You can also use honey (if not strictly vegan), agave nectar, or a few drops of liquid stevia for a sugar-free option. The sweetness can always be adjusted, so start with less and add more if needed.
-
Pure Vanilla Extract: 1 teaspoon. Do not underestimate the power of vanilla. It adds a crucial layer of warmth and depth, elevating the pudding from a simple “health food” to a genuinely delicious treat. It bridges the flavors of the coconut and the sweetener.
-
Pinch of Fine Sea Salt: About ⅛ teaspoon. Salt in a sweet dish might seem counterintuitive, but it is essential. A small pinch doesn’t make the pudding salty; it enhances the sweetness, balances the richness of the coconut milk, and makes all the other flavors pop.
Instructions
-
Choose Your Vessel: Select a container with a tight-fitting lid, such as a large mason jar (quart-sized is ideal) or a medium-sized bowl that you can cover securely with plastic wrap. A jar is highly recommended as it makes the mixing process incredibly easy.
-
Combine All Ingredients (The First Mix): In your chosen jar or bowl, combine the full-fat canned coconut milk, the ¼ cup of chia seeds, your desired amount of maple syrup, the vanilla extract, and the pinch of salt.
-
The Initial, Vigorous Mix: Secure the lid on your jar and shake it vigorously for a full 30-45 seconds, as if you were shaking a cocktail. If using a bowl, use a small whisk to stir everything together energetically for at least a minute. Your goal is to ensure every single chia seed is coated in liquid and fully dispersed. This initial mix is the first line of defense against clumping.
-
The First Rest: Let the mixture rest on the counter for 5 to 10 minutes. During this time, the chia seeds will begin to absorb the coconut milk and start their gelling process.
-
The Crucial Second Stir (The Anti-Clump Secret): This is the most important step for perfectly smooth chia pudding. After the 10-minute rest, you will notice that the chia seeds have begun to clump together and settle. Open the jar and give it another very vigorous shake, or whisk it thoroughly again. This second stir breaks up any forming clumps and redistributes the seeds, guaranteeing a smooth, consistent texture throughout the final pudding. Do not skip this step!
-
The Overnight Chill: Once you’ve completed the second stir, secure the lid and place the pudding in the refrigerator. Let it chill for at least 4 hours, but for the best and thickest results, let it set overnight (8-12 hours). During this time, the chia seeds will fully hydrate and absorb the liquid, transforming the mixture into a thick, spoonable pudding.
-
Check and Serve: The next morning, open the jar and give the pudding a final stir. It should be thick, creamy, and luscious. If it seems a little too thick for your liking, you can stir in a splash of extra coconut milk or another milk of your choice to loosen it. Serve chilled with your favorite toppings.
Nutrition
- Serving Size: one normal portion
- Calories: 450-500 kcal