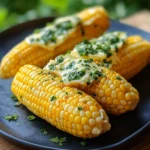
If there is one food that tastes like pure, undiluted summer, it has to be corn on the cob. I have countless childhood memories tied to it—sitting on the back porch steps, buttery fingers, a happy mess, and the simple, profound joy of sweet kernels bursting with flavor. For most of my life, corn was served one way: boiled and slathered with salted butter. It was perfect. Or so I thought. The real transformation happened a few years ago when I was preparing for a big family barbecue. On a whim, I decided to elevate the butter. I blitzed softened butter with a handful of fresh herbs from my garden—parsley, chives, a little thyme—along with a healthy dose of garlic and a pinch of lemon zest. The aroma alone was a revelation. When I slathered that vibrant, speckled green butter onto the hot, smoky grilled corn, something magical occurred. The butter melted into every nook and cranny, creating a sauce that was simultaneously rich, fresh, savory, and bright. It wasn’t just butter on corn anymore; it was a complete culinary thought. That day, the humble corn on the cob stole the show from the ribs and burgers, becoming the most talked-about dish. This recipe is the result of that discovery, a simple yet transformative way to turn a classic side dish into the star of any summer meal.
The Ultimate Corn on the Cob with Herb Butter
This recipe celebrates the peak-season sweetness of fresh corn by pairing it with a versatile and incredibly flavorful homemade compound butter. The beauty of this dish is its simplicity and its adaptability—we’ll cover the three best methods for cooking your corn to perfection, ensuring a flawless result whether you’re grilling, boiling, or roasting.
Complete Ingredients for a Perfect Summer Side Dish
The quality of your ingredients, though few, is paramount. Fresh corn and fresh herbs are non-negotiable for the best flavor.
For the Classic Herb Butter (Compound Butter):
- Unsalted Butter: 1 cup (2 sticks or 8 ounces), softened to room temperature. Using unsalted butter allows you to control the seasoning perfectly. Softening it is crucial for easy mixing.
- Fresh Parsley: ¼ cup, finely chopped. Flat-leaf (Italian) parsley provides a bright, clean, slightly peppery flavor.
- Fresh Chives: 2 tablespoons, finely chopped. These add a delicate, mild oniony bite without overpowering the other flavors.
- Fresh Thyme: 1 tablespoon of fresh thyme leaves, removed from the woody stems. Thyme adds a wonderful earthy, slightly floral note.
- Garlic: 2-3 cloves, minced very finely or pressed through a garlic press. The amount can be adjusted based on your love for garlic.
- Lemon Zest: Zest of 1 small lemon. This is a secret weapon that adds a brilliant, fresh aroma and a zesty tang that cuts through the richness of the butter.
- Kosher Salt: 1 teaspoon.
- Black Pepper: ½ teaspoon, freshly ground.
For the Corn on the Cob:
- Fresh Corn: 8 ears of fresh sweet corn, husks and silk removed (unless grilling in the husk).
Step-by-Step Instructions
The process can be broken down into two main parts: making the glorious herb butter and cooking the corn to juicy perfection using your preferred method.
Part 1: Making the Herb Butter
This butter can be made minutes before serving or days in advance.
- Combine Ingredients: In a medium bowl, place the 1 cup of softened unsalted butter. Add the finely chopped parsley, chives, thyme leaves, minced garlic, lemon zest, salt, and pepper.
- Mix Thoroughly: Using a fork or a rubber spatula, mix and mash all the ingredients together until they are completely and evenly distributed throughout the butter. The butter should be a beautiful pale yellow, speckled with green herbs.
- Shape and Chill (Optional but Recommended): For easy serving and storage, scoop the butter mixture onto a piece of parchment paper or plastic wrap. Form it into a log shape, about 1.5 inches in diameter. Roll the parchment or plastic wrap around the log, twisting the ends to tighten and compact it.
- Refrigerate: Place the butter log in the refrigerator for at least 1 hour to firm up. This will allow the flavors to meld and will make the butter easy to slice into perfect little serving pats.
Part 2: Cooking the Corn (Choose Your Method)
Select the cooking method that best suits your meal and equipment.
Method 1: Boiling (The Classic & Quickest)
This method produces plump, juicy, and tender corn.
- Prepare Water: Fill a large stockpot with enough water to fully submerge the ears of corn. Bring the water to a rolling boil over high heat. Important Tip: Do not salt the water, as this can sometimes draw moisture out and toughen the kernels.
- Boil the Corn: Carefully place the shucked ears of corn into the boiling water. Return the water to a boil.
- Cook: Once the water is boiling again, cook the corn for 5-7 minutes. The corn is done when the kernels are bright yellow and tender when pierced with a knife. Do not overcook, or the kernels can become mushy.
- Serve: Use tongs to carefully remove the corn from the hot water. Allow it to drain for a moment, then immediately slather with the prepared herb butter.
Method 2: Grilling (The Smoky & Charred)
This method imparts a delicious smoky flavor and beautiful char marks.
- Preheat Grill: Preheat your gas or charcoal grill to medium-high heat (around 400°F or 200°C).
- Choose Your Grilling Style:
- Directly on the Grates (For Maximum Char): Shuck the corn completely. Brush the kernels with a little olive oil or a bit of the melted herb butter. Place the corn directly on the hot grill grates. Grill for 10-15 minutes, turning every few minutes, until the kernels are tender and charred in spots.
- In the Husks (For Steamed, Tender Corn): Peel back the husks without detaching them, then remove all the silk. Slather the kernels with a generous amount of the herb butter. Pull the husks back up around the corn. Grill for 15-20 minutes, turning occasionally. The husks will char, but the corn inside will steam to perfection in the herby butter.
- Serve: Remove the corn from the grill. If cooked directly, slather with more herb butter. If cooked in the husk, carefully peel back the charred husk and serve.
Method 3: Roasting (The Hands-Off Oven Method)
Perfect for when you don’t want to fire up the grill or watch a pot on the stove.
- Preheat Oven: Preheat your oven to 400°F (200°C).
- Prepare Corn: Shuck the corn and place each ear on a separate piece of aluminum foil.
- Butter Up: Spread a generous amount of the herb butter all over each ear of corn.
- Wrap and Roast: Tightly wrap each ear of corn in the aluminum foil. Place the wrapped ears directly on the oven rack.
- Cook: Roast for 20-25 minutes, or until the corn is tender.
- Serve: Carefully unwrap the foil packets (beware of hot steam!) and serve immediately.
Nutrition Facts
These are estimates and can vary based on the size of the corn and the amount of butter used.
- Servings: 8
- Serving Size: 1 ear of corn with approximately 1 tablespoon of herb butter.
- Calories Per Serving: Approximately 180-220 calories.
Preparation and Cooking Time
- Preparation Time: 15 minutes (to make butter and shuck corn)
- Chilling Time (for butter): 1 hour (optional)
- Cooking Time: 10-25 minutes (depending on the method)
- Total Time: Approximately 30 minutes (active), 1.5 hours (with chilling)
How to Serve Your Corn on the Cob
While slathering the hot cobs with herb butter is perfection in itself, you can present this dish in several fun and creative ways.
- The Classic Side Dish: Serve the hot corn on a large platter alongside classic summer barbecue fare:
- Grilled Steaks, Chicken, or Pork Chops
- Smoky BBQ Ribs
- Juicy Burgers and Hot Dogs
- Fresh Garden Salads
- As a “Corn Ribs” Appetizer:
- Carefully stand a cooked ear of corn on its end and use a sharp, heavy knife to slice it lengthwise into quarters.
- Toss the “ribs” with more melted herb butter and serve as a fun, shareable finger food.
- Off-the-Cob Applications: Let the corn cool slightly, then stand it up in a large bowl and use a sharp knife to slice the kernels off the cob. This herb-butter-infused corn is incredible in:
- Salads: Toss with black beans, avocado, red onion, and a lime vinaigrette for a zesty corn salad.
- Salsas: Mix with diced tomatoes, jalapeños, cilantro, and lime juice.
- Relish: Serve as a topping for grilled fish or chicken.
- Pasta Dishes: Toss with cherry tomatoes, basil, and pasta for a simple summer meal.
- The Ultimate Corn Toppings Bar: For a fun and interactive party idea, set up a toppings bar and let guests customize their corn.
- Cheeses: Crumbled cotija, grated Parmesan, or crumbled feta.
- Spices: Chili powder, smoked paprika, or red pepper flakes for a kick.
- Sauces: A drizzle of sriracha mayo, a dollop of sour cream, or extra lime juice.
Compound Butter Variations: Beyond the Classic Herb
The classic herb butter is just the beginning. A compound butter is a blank canvas for flavor. Try these other amazing variations:
- Spicy Chili-Lime Butter:
- To 1 cup of softened butter, add the zest and juice of 1 lime, 1-2 teaspoons of chili powder, ½ teaspoon of smoked paprika, and ¼ cup of chopped fresh cilantro. This is the perfect butter for a Tex-Mex-inspired meal.
- Smoky Paprika & Garlic Butter:
- To 1 cup of softened butter, add 4 cloves of minced garlic, 1 tablespoon of smoked paprika, and 1 teaspoon of dried oregano. This gives the corn a deep, smoky, almost bacon-like flavor without any meat.
- Parmesan-Basil Butter:
- To 1 cup of softened butter, add ½ cup of finely grated Parmesan cheese, ¼ cup of finely chopped fresh basil, and 2 cloves of minced garlic. It’s like a delicious pesto butter that melts beautifully.
5 Additional Tips for Perfect Corn on the Cob
Follow these five expert tips to guarantee flawless corn every single time.
- Buy the Freshest Corn Possible: The sweetness of corn is directly related to its freshness. The sugars in corn begin to convert to starch the moment it’s picked. Look for corn with bright green, tightly wrapped husks and moist, light-brown or golden tassels (the silks at the top). Avoid corn with dry, yellowing husks or black, mushy tassels.
- Make the Herb Butter in Advance: Compound butter is the perfect make-ahead condiment. You can store the butter log tightly wrapped in the refrigerator for up to two weeks, or in the freezer for up to three months. Having a log of this “flavor gold” on hand is a game-changer for elevating not just corn, but also grilled meats, bread, and roasted vegetables.
- Don’t Shuck Until You’re Ready: The husk is nature’s perfect packaging, protecting the corn and keeping it from drying out. For the freshest, juiciest results, wait to shuck your corn until just before you’re ready to cook it.
- Embrace the “Butter Bath”: For an incredibly decadent and evenly coated result, try this trick. After cooking the corn (boiling works best for this), melt a whole stick of your prepared herb butter in a 9×13 inch baking dish. Place the hot, drained corn cobs in the dish and roll them around in the melted butter until they are completely drenched. Use tongs to transfer to a platter and serve immediately.
- Don’t Overcook It!: This is the most common mistake. Fresh, in-season sweet corn needs very little cooking time. Overcooking breaks down the cellular walls of the kernels, making them mushy and diminishing their natural sweetness and pop. 5-7 minutes in boiling water is truly all it takes.
Frequently Asked Questions (FAQ)
Here are answers to some of the most common questions about cooking corn on the cob.
1. Can I use frozen corn on the cob for this recipe?
Yes, you can, though fresh will always have the superior texture and flavor. If using frozen corn, there’s no need to thaw it first. You can add it directly to boiling water or wrap it in foil for roasting. You will need to increase the cooking time by a few minutes. For grilling, it’s best to thaw it first to ensure it cooks evenly.
2. Can I use dried herbs instead of fresh in the butter?
You can, but it will significantly change the flavor profile. Dried herbs are more concentrated and lack the bright, fresh quality of their fresh counterparts. If you must use dried herbs, use about one-third of the amount called for in the recipe (e.g., 1 tablespoon of fresh parsley = 1 teaspoon of dried parsley). Fresh herbs are highly recommended for this recipe.
3. How do I store leftover cooked corn on the cob?
Store leftover corn in an airtight container or wrapped tightly in plastic wrap in the refrigerator for up to 3-4 days. You can also cut the kernels off the cob and store them in a container. Reheat the corn briefly in the microwave, a hot pan, or back on the grill.
4. Why is my corn sometimes tough and chewy?
Tough corn is usually a result of two things: it wasn’t fresh to begin with, or it was overcooked. As corn gets older, its sugars turn to starch, which can lead to a less tender texture. Overcooking can also cause the kernels to become hard and chewy. Stick to the recommended cooking times for tender, juicy results.
5. How can I make a dairy-free or vegan version of the herb butter?
It’s very simple to make this recipe vegan! Just substitute the dairy butter with a high-quality vegan butter substitute. Look for one that comes in a stick form, as it will have a better texture for making compound butter than a soft, tub-style spread. The rest of the ingredients in the herb butter are naturally vegan.

Corn on the Cob with Herb Butter recipe
Ingredients
For the Classic Herb Butter (Compound Butter):
-
Unsalted Butter: 1 cup (2 sticks or 8 ounces), softened to room temperature. Using unsalted butter allows you to control the seasoning perfectly. Softening it is crucial for easy mixing.
-
Fresh Parsley: ¼ cup, finely chopped. Flat-leaf (Italian) parsley provides a bright, clean, slightly peppery flavor.
-
Fresh Chives: 2 tablespoons, finely chopped. These add a delicate, mild oniony bite without overpowering the other flavors.
-
Fresh Thyme: 1 tablespoon of fresh thyme leaves, removed from the woody stems. Thyme adds a wonderful earthy, slightly floral note.
-
Garlic: 2-3 cloves, minced very finely or pressed through a garlic press. The amount can be adjusted based on your love for garlic.
-
Lemon Zest: Zest of 1 small lemon. This is a secret weapon that adds a brilliant, fresh aroma and a zesty tang that cuts through the richness of the butter.
-
Kosher Salt: 1 teaspoon.
-
Black Pepper: ½ teaspoon, freshly ground.
For the Corn on the Cob:
-
Fresh Corn: 8 ears of fresh sweet corn, husks and silk removed (unless grilling in the husk).
Instructions
Part 1: Making the Herb Butter
This butter can be made minutes before serving or days in advance.
-
Combine Ingredients: In a medium bowl, place the 1 cup of softened unsalted butter. Add the finely chopped parsley, chives, thyme leaves, minced garlic, lemon zest, salt, and pepper.
-
Mix Thoroughly: Using a fork or a rubber spatula, mix and mash all the ingredients together until they are completely and evenly distributed throughout the butter. The butter should be a beautiful pale yellow, speckled with green herbs.
-
Shape and Chill (Optional but Recommended): For easy serving and storage, scoop the butter mixture onto a piece of parchment paper or plastic wrap. Form it into a log shape, about 1.5 inches in diameter. Roll the parchment or plastic wrap around the log, twisting the ends to tighten and compact it.
-
Refrigerate: Place the butter log in the refrigerator for at least 1 hour to firm up. This will allow the flavors to meld and will make the butter easy to slice into perfect little serving pats.
Part 2: Cooking the Corn (Choose Your Method)
Select the cooking method that best suits your meal and equipment.
Method 1: Boiling (The Classic & Quickest)
This method produces plump, juicy, and tender corn.
-
Prepare Water: Fill a large stockpot with enough water to fully submerge the ears of corn. Bring the water to a rolling boil over high heat. Important Tip: Do not salt the water, as this can sometimes draw moisture out and toughen the kernels.
-
Boil the Corn: Carefully place the shucked ears of corn into the boiling water. Return the water to a boil.
-
Cook: Once the water is boiling again, cook the corn for 5-7 minutes. The corn is done when the kernels are bright yellow and tender when pierced with a knife. Do not overcook, or the kernels can become mushy.
-
Serve: Use tongs to carefully remove the corn from the hot water. Allow it to drain for a moment, then immediately slather with the prepared herb butter.
Method 2: Grilling (The Smoky & Charred)
This method imparts a delicious smoky flavor and beautiful char marks.
-
Preheat Grill: Preheat your gas or charcoal grill to medium-high heat (around 400°F or 200°C).
-
Choose Your Grilling Style:
-
Directly on the Grates (For Maximum Char): Shuck the corn completely. Brush the kernels with a little olive oil or a bit of the melted herb butter. Place the corn directly on the hot grill grates. Grill for 10-15 minutes, turning every few minutes, until the kernels are tender and charred in spots.
-
In the Husks (For Steamed, Tender Corn): Peel back the husks without detaching them, then remove all the silk. Slather the kernels with a generous amount of the herb butter. Pull the husks back up around the corn. Grill for 15-20 minutes, turning occasionally. The husks will char, but the corn inside will steam to perfection in the herby butter.
-
-
Serve: Remove the corn from the grill. If cooked directly, slather with more herb butter. If cooked in the husk, carefully peel back the charred husk and serve.
Method 3: Roasting (The Hands-Off Oven Method)
Perfect for when you don’t want to fire up the grill or watch a pot on the stove.
-
Preheat Oven: Preheat your oven to 400°F (200°C).
-
Prepare Corn: Shuck the corn and place each ear on a separate piece of aluminum foil.
-
Butter Up: Spread a generous amount of the herb butter all over each ear of corn.
-
Wrap and Roast: Tightly wrap each ear of corn in the aluminum foil. Place the wrapped ears directly on the oven rack.
-
Cook: Roast for 20-25 minutes, or until the corn is tender.
-
Serve: Carefully unwrap the foil packets (beware of hot steam!) and serve immediately.
Nutrition
- Serving Size: one normal portion
- Calories: 180-220


