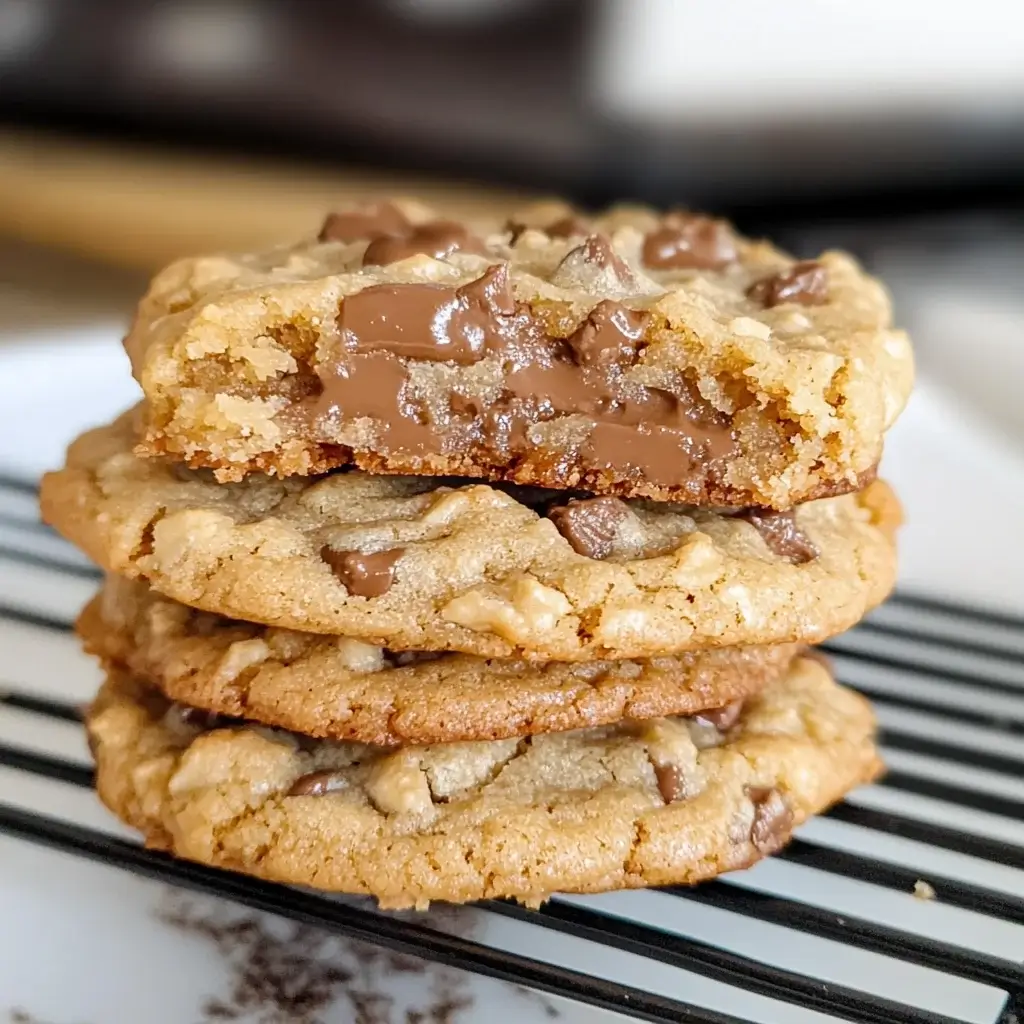
Let me tell you about a cookie. Not just any cookie, but the cookie. The one that, after just one bite, cemented itself into my permanent recipe rotation. It’s called the Carmelita, and honestly, the name doesn’t even begin to do it justice. I first encountered these oat-y, caramel-swirled wonders at a neighborhood bake sale. Intrigued by their rustic charm and the promise of caramel, I bought one on a whim. That whim turned into an all-consuming craving. The chewy oat base, the gooey ribbons of caramel, the satisfying crunch of chocolate chips and pecans – it was a symphony of textures and flavors that danced on my palate. I immediately tracked down the baker, practically begging for the recipe. And now, I’m sharing that treasure with you. This isn’t just a cookie recipe; it’s an experience. It’s the kind of cookie that makes you close your eyes and sigh with contentment. It’s perfect for sharing (if you can bear to part with them!), gifting, or simply indulging in a moment of pure, unadulterated cookie bliss. Prepare to fall head over heels for the Carmelita – I know I did.
Carmelita Cookie Recipe: The Ultimate Chewy Oat, Caramel, and Chocolate Dream
This Carmelita Cookie recipe is your ticket to baking soft, chewy, and utterly irresistible cookies packed with oats, gooey caramel, chocolate chips, and crunchy pecans. These aren’t your average cookies; they are a decadent treat that perfectly balances textures and flavors, creating a truly unforgettable baking experience. Whether you’re a seasoned baker or just starting out, this recipe is straightforward and rewarding, guaranteeing a batch of Carmelitas that will disappear in minutes. Get ready to experience cookie perfection!
Ingredients
This recipe uses simple, pantry-staple ingredients to create a cookie that’s far greater than the sum of its parts. Here’s what you’ll need to gather:
For the Oat Cookie Base:
- 1 cup (2 sticks) Unsalted Butter, softened: Essential for richness, flavor, and the perfect cookie texture. Make sure your butter is properly softened for easy creaming.
- 1 cup Packed Light Brown Sugar: Adds moisture, chewiness, and a hint of molasses flavor that complements the caramel beautifully. Pack it firmly when measuring.
- ½ cup Granulated Sugar: Provides sweetness and helps with browning and crisp edges.
- 2 Large Eggs: Bind the ingredients together and add richness and structure to the cookies.
- 1 teaspoon Vanilla Extract: Enhances the overall flavor profile, adding warmth and depth. Use pure vanilla extract for the best results.
- 1 ½ cups All-Purpose Flour: Provides structure to the cookies. Measure correctly by spooning and leveling or using a kitchen scale.
- 1 teaspoon Baking Soda: Leavening agent that helps the cookies rise and become chewy.
- 1 teaspoon Ground Cinnamon: Adds warmth and a subtle spice note that complements the oats and caramel.
- ½ teaspoon Salt: Balances the sweetness and enhances the other flavors.
- 3 cups Old-Fashioned Rolled Oats: The star of the cookie base, providing chewiness, texture, and a nutty flavor. Make sure to use old-fashioned rolled oats, not instant or steel-cut oats.
For the Gooey Caramel Filling:
- 1 cup (2 sticks) Unsalted Butter: Forms the base of the caramel, adding richness and flavor.
- 1 cup Packed Light Brown Sugar: Sweetens and thickens the caramel, contributing to its gooey texture.
- ½ cup Honey or Light Corn Syrup: Prevents crystallization and ensures a smooth, pourable caramel. Honey adds a slightly more complex flavor, while light corn syrup is more neutral.
- 1 (14 ounce) can Sweetened Condensed Milk: The secret ingredient for incredibly rich and creamy caramel. Do not substitute with evaporated milk.
- 1 teaspoon Vanilla Extract: Enhances the caramel flavor and adds a touch of warmth.
- ½ teaspoon Salt: Balances the sweetness of the caramel and enhances its flavor.
For the Chocolate and Nutty Add-Ins:
- 2 cups Semi-Sweet Chocolate Chips: Adds classic chocolatey goodness and a delightful melt-in-your-mouth texture. You can also use milk chocolate or dark chocolate chips, depending on your preference.
- 1 cup Chopped Pecans or Walnuts (Optional, but Highly Recommended): Provide a satisfying crunch and nutty flavor that complements the caramel and chocolate. Pecans are traditional, but walnuts are a delicious alternative.
Instructions: Baking Your Dreamy Carmelita Cookies
Follow these step-by-step instructions to bake a batch of Carmelita Cookies that will impress everyone who tries them. Don’t be intimidated by the multiple components – it’s easier than you think!
Step 1: Prepare the Oat Cookie Dough
- Preheat oven to 350°F (175°C). Line baking sheets with parchment paper. Parchment paper is essential to prevent sticking and for easy cleanup.
- In a large bowl, cream together the softened butter, light brown sugar, and granulated sugar until light and fluffy. Use an electric mixer (stand mixer or hand mixer) for the best results, creaming for 2-3 minutes until the mixture is pale and airy.
- Beat in the eggs one at a time, mixing well after each addition. Then, stir in the vanilla extract.
- In a separate medium bowl, whisk together the flour, baking soda, cinnamon, and salt. Whisking ensures the dry ingredients are evenly distributed.
- Gradually add the dry ingredients to the wet ingredients, mixing on low speed until just combined. Be careful not to overmix, as this can result in tough cookies.
- Stir in the rolled oats until evenly incorporated into the dough. The dough will be thick and slightly sticky.
Step 2: Make the Gooey Caramel Filling
- In a medium saucepan, melt the butter over medium heat.
- Stir in the light brown sugar and honey or light corn syrup. Cook, stirring constantly, until the sugar is dissolved and the mixture is smooth. This should take about 2-3 minutes.
- Reduce the heat to low and pour in the sweetened condensed milk. Be careful, as the mixture may bubble up slightly when you add the sweetened condensed milk.
- Continue to cook, stirring constantly, for 5-7 minutes, or until the caramel thickens slightly and becomes a rich amber color. The caramel should be thick enough to coat the back of a spoon.
- Remove the saucepan from the heat and stir in the vanilla extract and salt. Set the caramel aside to cool slightly while you assemble the cookies.
Step 3: Assemble and Bake the Carmelita Cookies
- Press half of the oat cookie dough evenly into the bottom of the prepared baking sheets. You can use your fingers or the back of a spoon to spread the dough. Aim for a thin, even layer.
- Pour the warm caramel filling evenly over the oat dough on both baking sheets, leaving a small border around the edges.
- Sprinkle the chocolate chips and chopped pecans (if using) evenly over the caramel layer on both baking sheets.
- Crumble the remaining oat cookie dough evenly over the chocolate chips and pecans. It’s okay if it’s not perfectly even; rustic is part of the charm!
- Bake for 20-25 minutes, or until the edges are golden brown and the center is set but still slightly soft. The baking time may vary slightly depending on your oven.
- Let the cookies cool completely on the baking sheets before cutting into squares or bars. Cooling completely is crucial for the caramel to set and for easier cutting.
Step 4: Cut and Serve
- Once completely cooled, use a sharp knife to cut the Carmelitas into squares or bars. You can cut them into squares for a more traditional bar cookie look, or into larger rectangles or even triangles.
- Serve and enjoy these decadent treats! They are delicious warm, at room temperature, or even slightly chilled.
Nutrition Facts (Estimated)
(Please note: Nutritional values are estimates and can vary significantly based on specific ingredient brands, portion sizes, and how thickly you cut the cookies. This is an approximate guide per serving, assuming the recipe yields 24 cookies)
- Serving Size: 1 Carmelita Cookie (approximately 1/24th of the recipe)
- Calories per Serving: Approximately 350-400 calories
- Protein: 4-5g
- Fat: 20-25g (primarily from butter, chocolate chips, and nuts)
- Saturated Fat: 12-15g
- Cholesterol: 60-70mg
- Sodium: 150-200mg
- Carbohydrates: 40-45g
- Fiber: 2-3g
- Sugar: 30-35g (primarily from brown sugar, granulated sugar, honey/corn syrup, sweetened condensed milk, and chocolate chips)
Key Nutritional Considerations:
- High in Calories and Sugar: Carmelita Cookies are a decadent treat and are relatively high in calories and sugar due to the butter, sugar, caramel, and chocolate chips. Enjoy them in moderation as an occasional indulgence.
- Moderate Fat Content: They are also fairly high in fat, mainly from butter, chocolate, and nuts. While some of these fats are saturated, they also contain some unsaturated fats, especially if using pecans or walnuts.
- Source of Carbohydrates: The oats and flour contribute carbohydrates, and the oats provide some fiber.
- Not a Significant Source of Vitamins or Minerals: While they contain some nutrients from the oats, nuts, and dairy, Carmelita Cookies are primarily a treat and not a significant source of essential vitamins and minerals.
Preparation Time
- Prep Time: 30-40 minutes (softening butter, measuring ingredients, making dough and caramel)
- Cook Time: 20-25 minutes (baking)
- Cooling Time: 2-3 hours (or longer, until completely cooled and caramel is set)
- Total Time: Approximately 3-4 hours (including cooling time)
While the total time seems lengthy, most of it is hands-off cooling time. The active preparation and baking time are relatively manageable, making these cookies achievable even on a busy day. You can also make the dough and caramel ahead of time and assemble and bake the cookies later.
How to Serve Your Glorious Carmelita Cookies
Carmelita Cookies are incredibly versatile and can be enjoyed in numerous ways. Here are some delightful serving suggestions:
- Classic Cookie Platter:
- Arrange Carmelita Cookies on a beautiful platter alongside other favorite cookies, like chocolate chip cookies, peanut butter cookies, or snickerdoodles for a delightful dessert spread.
- Perfect for parties, holidays, or potlucks.
- Warm with Ice Cream:
- Slightly warm a Carmelita Cookie in the microwave for a few seconds until it’s gooey and melty.
- Serve it warm with a scoop of vanilla ice cream, caramel swirl ice cream, or even coffee ice cream for an extra decadent dessert.
- Pair with Coffee or Tea:
- Enjoy a Carmelita Cookie with a hot cup of coffee, tea, or latte for a comforting afternoon treat or a sweet ending to a meal.
- The warm beverage complements the richness of the cookie perfectly.
- Dessert Bars for a Crowd:
- Cut the Carmelitas into smaller squares or bars and arrange them on a serving tray for easy grab-and-go desserts at gatherings.
- Their sturdy texture makes them ideal for serving to a crowd.
- Gift Giving:
- Package Carmelita Cookies in cellophane bags, cookie tins, or decorative boxes to give as thoughtful homemade gifts to friends, family, neighbors, or coworkers.
- They are a universally loved treat that makes a wonderful and appreciated gift.
- Lunchbox Treat (Occasional Indulgence):
- Include a Carmelita Cookie as a special treat in a lunchbox for yourself or a loved one.
- While they are high in sugar, they are a delightful occasional indulgence.
- Simple and Solo:
- Sometimes, the best way to enjoy a Carmelita Cookie is simply on its own, savoring each bite and the incredible combination of flavors and textures.
- Perfect for a moment of personal indulgence and relaxation.
Additional Tips for Carmelita Cookie Perfection
Here are five essential tips to ensure your Carmelita Cookies are absolutely irresistible every time:
- Don’t Overbake! The key to chewy Carmelitas is to avoid overbaking them. Bake until the edges are golden brown and the center is set but still slightly soft. They will continue to set up as they cool. Overbaked cookies will be dry and crumbly.
- Use Parchment Paper (Seriously!) Parchment paper is your best friend for Carmelita Cookies. It prevents sticking, makes for easy cleanup, and helps you lift the baked cookies cleanly from the baking sheets once cooled. Don’t skip this step!
- Let the Caramel Cool Slightly Before Pouring: While you want the caramel to be warm and pourable, let it cool for a few minutes after removing it from the heat before pouring it over the cookie dough. This will prevent it from melting the dough too much and ensure a better layering effect.
- Don’t Worry About Crumbly Dough Topping: The top oat dough layer is meant to be crumbled over the caramel, not pressed down smoothly. Embrace the rustic look! The crumbles create a beautiful texture and allow the caramel and chocolate to peek through.
- Cool Completely Before Cutting (Patience is Key): This is perhaps the most crucial tip! Resist the urge to cut into the Carmelitas while they are still warm. Cooling them completely, ideally for several hours or even overnight, allows the caramel to set properly, making them much easier to cut and preventing a gooey mess. Patience is rewarded!
FAQ: Your Carmelita Cookie Questions Answered
Here are answers to some frequently asked questions about making Carmelita Cookies:
Q1: Can I make Carmelita Cookies ahead of time?
A: Yes, Carmelita Cookies are excellent for making ahead! They actually taste even better the next day as the flavors meld together. You can bake them a day or two in advance and store them in an airtight container at room temperature. They also freeze well (see Q5).
Q2: Can I use quick-cooking oats instead of old-fashioned rolled oats?
A: No, it is not recommended to use quick-cooking oats. Old-fashioned rolled oats provide the best texture and chewiness for Carmelita Cookies. Quick-cooking oats are more finely processed and will result in a drier, less chewy cookie.
Q3: Can I substitute walnuts for pecans?
A: Yes, absolutely! Walnuts are a delicious substitute for pecans in Carmelita Cookies. They offer a slightly different flavor profile but still provide a wonderful crunch and nutty complement to the caramel and chocolate. You can also use a mix of pecans and walnuts.
Q4: My caramel filling is too thin. What did I do wrong?
A: If your caramel filling is too thin, it may not have cooked long enough. Make sure you cook the caramel for the full 5-7 minutes after adding the sweetened condensed milk, stirring constantly, until it thickens to a rich amber color and coats the back of a spoon. Also, ensure you are using sweetened condensed milk and not evaporated milk.
Q5: How do I store Carmelita Cookies and can I freeze them?
A: Store Carmelita Cookies in an airtight container at room temperature for up to 4-5 days. For longer storage, you can freeze them. To freeze, cut the cooled cookies into squares or bars, wrap them individually in plastic wrap or foil, and then place them in a freezer-safe bag or container. Freeze for up to 2-3 months. Thaw at room temperature before serving.
Enjoy baking and sharing these incredibly delicious Carmelita Cookies! They are a guaranteed crowd-pleaser and will quickly become a cherished recipe in your baking repertoire. Prepare to be declared the cookie champion!
Print
Crave Carmelita Cookie Recipe
Ingredients
For the Oat Cookie Base:
- 1 cup (2 sticks) Unsalted Butter, softened: Essential for richness, flavor, and the perfect cookie texture. Make sure your butter is properly softened for easy creaming.
- 1 cup Packed Light Brown Sugar: Adds moisture, chewiness, and a hint of molasses flavor that complements the caramel beautifully. Pack it firmly when measuring.
- ½ cup Granulated Sugar: Provides sweetness and helps with browning and crisp edges.
- 2 Large Eggs: Bind the ingredients together and add richness and structure to the cookies.
- 1 teaspoon Vanilla Extract: Enhances the overall flavor profile, adding warmth and depth. Use pure vanilla extract for the best results.
- 1 ½ cups All-Purpose Flour: Provides structure to the cookies. Measure correctly by spooning and leveling or using a kitchen scale.
- 1 teaspoon Baking Soda: Leavening agent that helps the cookies rise and become chewy.
- 1 teaspoon Ground Cinnamon: Adds warmth and a subtle spice note that complements the oats and caramel.
- ½ teaspoon Salt: Balances the sweetness and enhances the other flavors.
- 3 cups Old-Fashioned Rolled Oats: The star of the cookie base, providing chewiness, texture, and a nutty flavor. Make sure to use old-fashioned rolled oats, not instant or steel-cut oats.
For the Gooey Caramel Filling:
- 1 cup (2 sticks) Unsalted Butter: Forms the base of the caramel, adding richness and flavor.
- 1 cup Packed Light Brown Sugar: Sweetens and thickens the caramel, contributing to its gooey texture.
- ½ cup Honey or Light Corn Syrup: Prevents crystallization and ensures a smooth, pourable caramel. Honey adds a slightly more complex flavor, while light corn syrup is more neutral.
- 1 (14 ounce) can Sweetened Condensed Milk: The secret ingredient for incredibly rich and creamy caramel. Do not substitute with evaporated milk.
- 1 teaspoon Vanilla Extract: Enhances the caramel flavor and adds a touch of warmth.
- ½ teaspoon Salt: Balances the sweetness of the caramel and enhances its flavor.
Instructions
Step 1: Prepare the Oat Cookie Dough
- Preheat oven to 350°F (175°C). Line baking sheets with parchment paper. Parchment paper is essential to prevent sticking and for easy cleanup.
- In a large bowl, cream together the softened butter, light brown sugar, and granulated sugar until light and fluffy. Use an electric mixer (stand mixer or hand mixer) for the best results, creaming for 2-3 minutes until the mixture is pale and airy.
- Beat in the eggs one at a time, mixing well after each addition. Then, stir in the vanilla extract.
- In a separate medium bowl, whisk together the flour, baking soda, cinnamon, and salt. Whisking ensures the dry ingredients are evenly distributed.
- Gradually add the dry ingredients to the wet ingredients, mixing on low speed until just combined. Be careful not to overmix, as this can result in tough cookies.
- Stir in the rolled oats until evenly incorporated into the dough. The dough will be thick and slightly sticky.
Step 2: Make the Gooey Caramel Filling
- In a medium saucepan, melt the butter over medium heat.
- Stir in the light brown sugar and honey or light corn syrup. Cook, stirring constantly, until the sugar is dissolved and the mixture is smooth. This should take about 2-3 minutes.
- Reduce the heat to low and pour in the sweetened condensed milk. Be careful, as the mixture may bubble up slightly when you add the sweetened condensed milk.
- Continue to cook, stirring constantly, for 5-7 minutes, or until the caramel thickens slightly and becomes a rich amber color. The caramel should be thick enough to coat the back of a spoon.
- Remove the saucepan from the heat and stir in the vanilla extract and salt. Set the caramel aside to cool slightly while you assemble the cookies.
Step 3: Assemble and Bake the Carmelita Cookies
- Press half of the oat cookie dough evenly into the bottom of the prepared baking sheets. You can use your fingers or the back of a spoon to spread the dough. Aim for a thin, even layer.
- Pour the warm caramel filling evenly over the oat dough on both baking sheets, leaving a small border around the edges.
- Sprinkle the chocolate chips and chopped pecans (if using) evenly over the caramel layer on both baking sheets.
- Crumble the remaining oat cookie dough evenly over the chocolate chips and pecans. It’s okay if it’s not perfectly even; rustic is part of the charm!
- Bake for 20-25 minutes, or until the edges are golden brown and the center is set but still slightly soft. The baking time may vary slightly depending on your oven.
- Let the cookies cool completely on the baking sheets before cutting into squares or bars. Cooling completely is crucial for the caramel to set and for easier cutting.
Step 4: Cut and Serve
- Once completely cooled, use a sharp knife to cut the Carmelitas into squares or bars. You can cut them into squares for a more traditional bar cookie look, or into larger rectangles or even triangles.
- Serve and enjoy these decadent treats! They are delicious warm, at room temperature, or even slightly chilled.
Nutrition
- Serving Size: one normal portion
- Calories: 350-400
- Sugar: 30-35g
- Sodium: 150-200mg
- Fat: 20-25g
- Saturated Fat: 12-15g
- Carbohydrates: 40-45g
- Fiber: 2-3g
- Protein: 4-5g
- Cholesterol: 60-70mg


