")

I’ve always believed that some desserts should be more than just a sweet treat; they should be an experience. I discovered this firsthand when I decided to tackle a “Galaxy Cheesecake” for my nephew’s space-themed birthday party. I was a little intimidated, scrolling through photos of what looked like edible works of cosmic art. Could a home baker really recreate a nebula in a cheesecake? I decided to find out. The process was surprisingly meditative—dividing the creamy white filling, dropping in jewel-toned shades of blue, purple, and black, and then that magical moment of swirling them together. When I pulled the finished cheesecake from the fridge the next day, I was speechless. It was stunning. The deep black Oreo crust was the perfect night sky for the swirling, vibrant colors above, and the tiny silver stars I sprinkled on top seemed to twinkle under the kitchen lights. But the real moment of triumph was at the party. When I brought it to the table, a chorus of “wows” erupted from both kids and adults. My nephew’s eyes were as wide as saucers. It wasn’t just a cake; it was the party’s centerpiece, a conversation starter, and most importantly, it was absolutely delicious. The cool, creamy tang of the cheesecake against the rich, crunchy chocolate crust was a flavor combination as timeless as the stars themselves. It was proof that with a little creativity, you can create something truly out-of-this-world in your own kitchen.
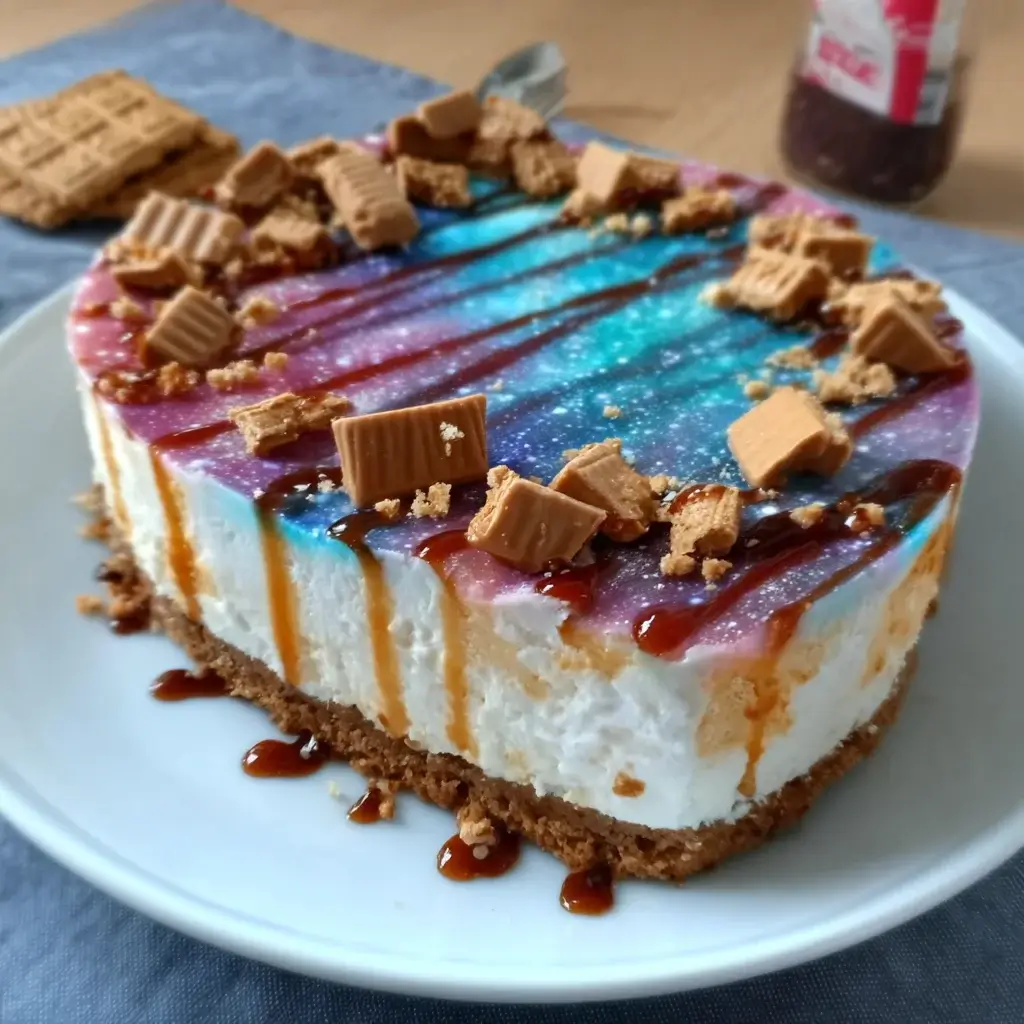
Stunning Galaxy Cheesecake: A No-Bake Recipe for the Stars
Welcome to one of the most visually spectacular desserts you will ever make. The Galaxy Cheesecake is a no-bake creation that captures the awe-inspiring beauty of a distant nebula or a star-filled night sky. It features a dark, crumbly chocolate cookie crust that serves as the perfect void of space, topped with a rich, creamy cheesecake filling swirled with cosmic colors like deep blue, vibrant violet, and brilliant magenta, all against a backdrop of inky black. A final dusting of edible glitter and star-sprinkles completes the celestial illusion.
While it looks like a masterpiece from a high-end patisserie, the beauty of this recipe is its simplicity. Because it’s a no-bake cheesecake, you don’t have to worry about water baths, oven temperatures, or the dreaded cracking. It’s an accessible project for bakers of any skill level, relying more on artistic flair than on complicated technique. This makes it the perfect show-stopping dessert for birthday parties (especially with a space or science theme), Halloween gatherings, New Year’s Eve celebrations, or any event where you want to serve something truly memorable.
Complete Ingredients for Your Cosmic Creation
The key to a successful Galaxy Cheesecake is using high-quality, full-fat ingredients for the creamiest texture and vibrant gel food colorings for the most intense cosmic swirls. This recipe is designed for a 9-inch springform pan.
For the Dark Matter Oreo Crust:
- 32 Oreo cookies (or similar chocolate sandwich cookies, about 350g)
- 6 tablespoons (85g) unsalted butter, melted
For the Creamy Nebula Filling:
- 24 ounces (680g) full-fat block cream cheese, softened to room temperature
- 1 ½ cups (360ml) cold heavy whipping cream
- 1 ¼ cups (150g) powdered sugar (also known as icing sugar)
- 1 teaspoon pure vanilla extract
- Pinch of fine sea salt
- For the Galaxy Colors:
- High-quality gel food coloring (essential for vibrant colors). Recommended shades: Black, Royal Blue, Violet, and Pink or Magenta.
For the Starry Night Decorations:
- Edible silver glitter
- Edible star sprinkles (silver or gold)
- Optional: Silver luster dust mixed with a few drops of clear alcohol (like vodka) or lemon extract for a “splatter” effect.
Step-by-Step Instructions to a Delicious Universe
Follow these detailed steps to assemble your stunning edible galaxy. The process is broken down into easy-to-manage stages, ensuring a flawless result.
Step 1: Forge the Dark Matter Crust
First, prepare your foundation. To crush the Oreo cookies, you can either place them in a food processor and pulse until they form fine crumbs, or you can place them in a large, sealed zip-top bag and crush them with a rolling pin (a great way to release some stress!). You want a consistent, sandy texture.
Transfer the fine crumbs to a medium bowl. Pour the melted unsalted butter over the crumbs and mix thoroughly with a fork until all the crumbs are evenly moistened and resemble wet sand. Tip the buttery crumb mixture into a 9-inch springform pan. Using the flat bottom of a measuring cup or glass, press the crumbs firmly and evenly across the bottom of the pan and slightly up the sides to create a solid, compact base. Place the crust in the freezer to chill and firm up for at least 15 minutes while you prepare the filling.
Step 2: Create the Creamy Nebula Filling
In a large mixing bowl, place the softened block cream cheese. It is crucial that the cream cheese is at room temperature to ensure a smooth, lump-free filling. Beat the cream cheese with an electric hand mixer (or in the bowl of a stand mixer fitted with the paddle attachment) on medium speed for 2-3 minutes, until it is completely smooth and creamy.
Sift the powdered sugar directly into the bowl with the cream cheese to remove any lumps. Add the vanilla extract and the pinch of salt. Beat again on low speed until the sugar is incorporated, then increase to medium speed and beat until the mixture is light and smooth. Scrape down the sides and bottom of the bowl to ensure everything is well combined.
In a separate, clean, and chilled mixing bowl, pour the cold heavy whipping cream. Using clean beaters, whip the cream on medium-high speed until it forms stiff peaks. This means that when you lift the beaters out of the cream, the peak that forms holds its shape without drooping. This whipped cream is what gives the no-bake cheesecake its light texture and stability.
Gently fold the stiffly whipped cream into the cream cheese mixture using a rubber spatula. Do this in two or three additions, folding just until no white streaks remain. Be careful not to overmix, as you want to keep the air you whipped into the cream. The result should be a thick, luscious, and smooth cheesecake filling.
Step 3: Mix Your Cosmic Colors
Now for the artistic part. Divide the cheesecake filling into separate bowls for coloring. You will want one large portion to be your base color (black or dark navy blue works best) and several smaller portions for the accent colors. A good ratio is to keep about half the filling for the black base, and divide the other half among 3-4 smaller bowls for the blue, violet, and pink.
Add a few drops of gel food coloring to each bowl. Remember that gel coloring is highly concentrated, so start with a small amount and add more until you reach your desired shade. Stir each bowl gently but thoroughly until the color is uniform.
Step 4: Assemble the Galaxy
Remove your chilled crust from the freezer. Begin by dropping large spoonfuls of the black (or darkest blue) cheesecake filling onto the crust, leaving plenty of space between the dollops. Next, fill in the gaps with spoonfuls of the blue, violet, and pink fillings. Don’t worry about being neat; the random placement is what creates the natural, cosmic look. Continue layering dollops of the different colors on top of each other until all the filling is used. Gently smooth the top with an offset spatula just enough to create a level surface.
Take a wooden skewer or a toothpick and gently drag it through the different colored sections in a few light figure-eight or swirling motions. The key here is less is more. You are aiming to create ribbons of color, not to mix them together into a single muddy purple. A few gentle swirls are all you need to achieve a beautiful nebula effect.
Step 5: Chill to Set
Cover the springform pan loosely with plastic wrap (be careful not to let it touch the surface of the cheesecake) and place it in the refrigerator to chill and set. This is the most important step for a no-bake cheesecake. It needs a minimum of 6-8 hours to become firm enough to slice, but for the best results and a clean cut, let it chill overnight.
Step 6: Add the Stars and Serve
Once the cheesecake is fully chilled and firm, it’s time for the final decorations. Carefully run a thin knife around the edge of the cheesecake to loosen it from the sides of the springform pan before unlatching and removing the ring.
To create a “starry sky,” you can use a few techniques. Sprinkle edible silver glitter generously over the surface. Carefully place edible star sprinkles around the cake. For a realistic star-splatter effect, mix a small amount of silver luster dust with a few drops of clear vodka or lemon extract to form a paint-like consistency. Dip a clean, stiff-bristled paintbrush or a toothbrush into the mixture, aim it at the cake, and run your thumb over the bristles to flick tiny silver droplets across the surface.
Slice with a hot, sharp knife, serve immediately, and watch your guests marvel at your edible universe.
Nutrition Facts
Please note that these values are an approximation and will vary based on the specific brands and quantities of ingredients used. This is a rich, decadent dessert meant for special occasions.
- Servings: 12-16 slices
- Calories per serving: Approximately 550-650 kcal
Preparation and Cooking Time
This recipe requires minimal active time, with most of the duration dedicated to hands-off chilling.
- Preparation Time: 35 minutes
- Chilling Time: 6-8 hours, or preferably overnight
- Total Time: 6 hours 35 minutes to 8 hours 35 minutes
How to Serve Your Galaxy Cheesecake
The presentation of this cheesecake is just as important as its taste. Here are some ideas to make it a truly out-of-this-world experience.
- For Maximum Visual Impact:
- Plate Choice: Serve slices on dark-colored plates (black or dark blue) to make the vibrant galaxy colors pop even more.
- Clean Slices: Use the “hot knife” trick for perfectly clean, professional-looking slices. Fill a tall glass with hot water, dip a long, sharp knife into the water, wipe it clean and dry with a paper towel, make one cut, and repeat the process for every single slice.
- Centerpiece Glory: Present the cheesecake whole on a simple, elegant cake stand before slicing, allowing everyone to admire your handiwork.
- Perfect for Themed Events:
- Space-Themed Birthday Parties: This is the ultimate cake for any aspiring astronaut or stargazer.
- Halloween Parties: The dark, swirling colors can easily take on a spooky, mystical vibe.
- New Year’s Eve: Celebrate the new year with a dessert that’s as sparkly and magical as the occasion itself.
- Movie Nights: A perfect treat for a sci-fi movie marathon with friends.
- Simple Drink Pairings:
- The cheesecake is rich and flavorful, so it’s best paired with a simple beverage that won’t compete.
- A classic cup of black coffee or a simple espresso.
- A glass of cold milk (a nostalgic pairing with the Oreo crust).
- A simple cup of black or herbal tea.
Additional Tips for a Perfect Cosmic Cheesecake
These five tips will help you navigate the cosmos of cheesecake-making and ensure a flawless result every time.
- Room Temperature Ingredients are Non-Negotiable: This is the golden rule of cheesecake making, even for no-bake versions. Using cold cream cheese will result in a lumpy, unpleasant texture that no amount of mixing can fix. Take your cream cheese out of the refrigerator at least an-hour or two before you begin, so it’s perfectly soft and ready to blend into a silky-smooth filling.
- Full-Fat is Your Best Friend: This is not the time to substitute with low-fat or reduced-fat ingredients. The structure and rich, creamy mouthfeel of a no-bake cheesecake rely entirely on the high fat content of full-fat block cream cheese and heavy whipping cream. Low-fat versions contain more water and will likely result in a cheesecake that is runny and fails to set properly.
- Gel Food Coloring is Essential: Do not be tempted to use standard liquid food coloring from the grocery store. Liquid coloring is water-based and will thin out your cheesecake batter, potentially compromising its ability to set. Gel food colorings are highly concentrated, so you only need a tiny amount to achieve deep, vibrant, and brilliant colors without altering the perfect consistency of your filling.
- The Art of the Gentle Swirl: The most common mistake when making a galaxy or marble-effect dessert is over-mixing. You are not trying to blend the colors, but rather to create distinct ribbons and patterns. After you’ve dolloped your colors, use a skewer to make just two or three gentle figure-eight motions through the batter. It’s always better to under-swirl than to over-swirl. Stop as soon as you see a pattern you like.
- Master the Hot Knife Trick for Clean Slices: You’ve created a work of art; don’t ruin it with messy slices. The “hot knife” method is a professional secret for perfect cuts. The heat from the blade warms the cheesecake just enough to slice through it like butter, preventing the filling from dragging and smearing. Fill a tall pitcher with hot water, dip your knife, wipe it completely dry, make one cut, and repeat for every single slice. It’s a small extra step that makes a huge difference in presentation.
Frequently Asked Questions (FAQ)
Here are answers to some of the most common questions about creating this spectacular Galaxy Cheesecake.
1. Can I use a baked cheesecake recipe for this galaxy effect?
Yes, you can adapt this visual concept to a baked cheesecake, but the process is different. You would prepare your favorite baked cheesecake batter, color it as described, and swirl it directly in the crust before baking. The key differences are that you must use a water bath (bain-marie) to prevent cracking and ensure even cooking. Be aware that the colors may darken or change slightly during the baking process, often becoming less vibrant than in a no-bake version.
2. My no-bake cheesecake didn’t set properly and is too soft. What did I do wrong?
This is a common issue with a few likely causes. The most frequent culprit is not whipping the heavy cream to stiff peaks. The air incorporated during this step is essential for the cheesecake’s structure. Another cause could be using low-fat cream cheese or light cream, which lack the necessary fat to set firmly. Finally, the cheesecake may simply not have been chilled for long enough. A no-bake cheesecake truly needs a solid 6-8 hours, or preferably a full night in the refrigerator, to fully firm up.
3. Where can I find the special ingredients like edible glitter and gel food coloring?
These items have become much more accessible in recent years. You can typically find gel food coloring, edible glitter, and various sprinkles in the baking aisle of major craft stores like Michaels or JOANN. Specialty kitchen supply stores are also a great source. For the widest selection, online retailers like Amazon, Wilton, or AmeriColor’s website offer a vast array of colors and decorative elements.
4. Can I make this Galaxy Cheesecake ahead of time?
Absolutely! This is an ideal make-ahead dessert, which is perfect for stress-free party planning. You can prepare the entire cheesecake up to 2-3 days in advance and store it, covered, in the refrigerator. In fact, the flavor and texture often improve after a day or two. For the best visual result, I recommend waiting to add the final decorative touches like the edible glitter and star sprinkles until just before you plan to serve it. This ensures they remain sparkly and don’t absorb moisture from the cheesecake.
5. Is it possible to freeze this Galaxy Cheesecake?
Yes, this cheesecake freezes remarkably well. After it has fully set in the refrigerator, you can freeze it either whole or in individual slices. For best results, place the uncovered cheesecake (or slices on a baking sheet) in the freezer for about an hour to “flash freeze.” This firms up the surface. Then, wrap it tightly in two layers of plastic wrap, followed by a layer of aluminum foil to prevent freezer burn. It can be stored in the freezer for up to 2 months. To serve, thaw it overnight in the refrigerator. Do not thaw it at room temperature, as this can affect the texture.

Galaxy Cheesecake recipe
Ingredients
For the Dark Matter Oreo Crust:
-
32 Oreo cookies (or similar chocolate sandwich cookies, about 350g)
-
6 tablespoons (85g) unsalted butter, melted
For the Creamy Nebula Filling:
-
24 ounces (680g) full-fat block cream cheese, softened to room temperature
-
1 ½ cups (360ml) cold heavy whipping cream
-
1 ¼ cups (150g) powdered sugar (also known as icing sugar)
-
1 teaspoon pure vanilla extract
-
Pinch of fine sea salt
-
For the Galaxy Colors:
-
High-quality gel food coloring (essential for vibrant colors). Recommended shades: Black, Royal Blue, Violet, and Pink or Magenta.
-
Instructions
Step 1: Forge the Dark Matter Crust
First, prepare your foundation. To crush the Oreo cookies, you can either place them in a food processor and pulse until they form fine crumbs, or you can place them in a large, sealed zip-top bag and crush them with a rolling pin (a great way to release some stress!). You want a consistent, sandy texture.
Transfer the fine crumbs to a medium bowl. Pour the melted unsalted butter over the crumbs and mix thoroughly with a fork until all the crumbs are evenly moistened and resemble wet sand. Tip the buttery crumb mixture into a 9-inch springform pan. Using the flat bottom of a measuring cup or glass, press the crumbs firmly and evenly across the bottom of the pan and slightly up the sides to create a solid, compact base. Place the crust in the freezer to chill and firm up for at least 15 minutes while you prepare the filling.
Step 2: Create the Creamy Nebula Filling
In a large mixing bowl, place the softened block cream cheese. It is crucial that the cream cheese is at room temperature to ensure a smooth, lump-free filling. Beat the cream cheese with an electric hand mixer (or in the bowl of a stand mixer fitted with the paddle attachment) on medium speed for 2-3 minutes, until it is completely smooth and creamy.
Sift the powdered sugar directly into the bowl with the cream cheese to remove any lumps. Add the vanilla extract and the pinch of salt. Beat again on low speed until the sugar is incorporated, then increase to medium speed and beat until the mixture is light and smooth. Scrape down the sides and bottom of the bowl to ensure everything is well combined.
In a separate, clean, and chilled mixing bowl, pour the cold heavy whipping cream. Using clean beaters, whip the cream on medium-high speed until it forms stiff peaks. This means that when you lift the beaters out of the cream, the peak that forms holds its shape without drooping. This whipped cream is what gives the no-bake cheesecake its light texture and stability.
Gently fold the stiffly whipped cream into the cream cheese mixture using a rubber spatula. Do this in two or three additions, folding just until no white streaks remain. Be careful not to overmix, as you want to keep the air you whipped into the cream. The result should be a thick, luscious, and smooth cheesecake filling.
Step 3: Mix Your Cosmic Colors
Now for the artistic part. Divide the cheesecake filling into separate bowls for coloring. You will want one large portion to be your base color (black or dark navy blue works best) and several smaller portions for the accent colors. A good ratio is to keep about half the filling for the black base, and divide the other half among 3-4 smaller bowls for the blue, violet, and pink.
Add a few drops of gel food coloring to each bowl. Remember that gel coloring is highly concentrated, so start with a small amount and add more until you reach your desired shade. Stir each bowl gently but thoroughly until the color is uniform.
Step 4: Assemble the Galaxy
Remove your chilled crust from the freezer. Begin by dropping large spoonfuls of the black (or darkest blue) cheesecake filling onto the crust, leaving plenty of space between the dollops. Next, fill in the gaps with spoonfuls of the blue, violet, and pink fillings. Don’t worry about being neat; the random placement is what creates the natural, cosmic look. Continue layering dollops of the different colors on top of each other until all the filling is used. Gently smooth the top with an offset spatula just enough to create a level surface.
Take a wooden skewer or a toothpick and gently drag it through the different colored sections in a few light figure-eight or swirling motions. The key here is less is more. You are aiming to create ribbons of color, not to mix them together into a single muddy purple. A few gentle swirls are all you need to achieve a beautiful nebula effect.
Step 5: Chill to Set
Cover the springform pan loosely with plastic wrap (be careful not to let it touch the surface of the cheesecake) and place it in the refrigerator to chill and set. This is the most important step for a no-bake cheesecake. It needs a minimum of 6-8 hours to become firm enough to slice, but for the best results and a clean cut, let it chill overnight.
Step 6: Add the Stars and Serve
Once the cheesecake is fully chilled and firm, it’s time for the final decorations. Carefully run a thin knife around the edge of the cheesecake to loosen it from the sides of the springform pan before unlatching and removing the ring.
To create a “starry sky,” you can use a few techniques. Sprinkle edible silver glitter generously over the surface. Carefully place edible star sprinkles around the cake. For a realistic star-splatter effect, mix a small amount of silver luster dust with a few drops of clear vodka or lemon extract to form a paint-like consistency. Dip a clean, stiff-bristled paintbrush or a toothbrush into the mixture, aim it at the cake, and run your thumb over the bristles to flick tiny silver droplets across the surface.
Slice with a hot, sharp knife, serve immediately, and watch your guests marvel at your edible universe.
Nutrition
- Serving Size: one normal portion
- Calories: 550-650 kcal