")

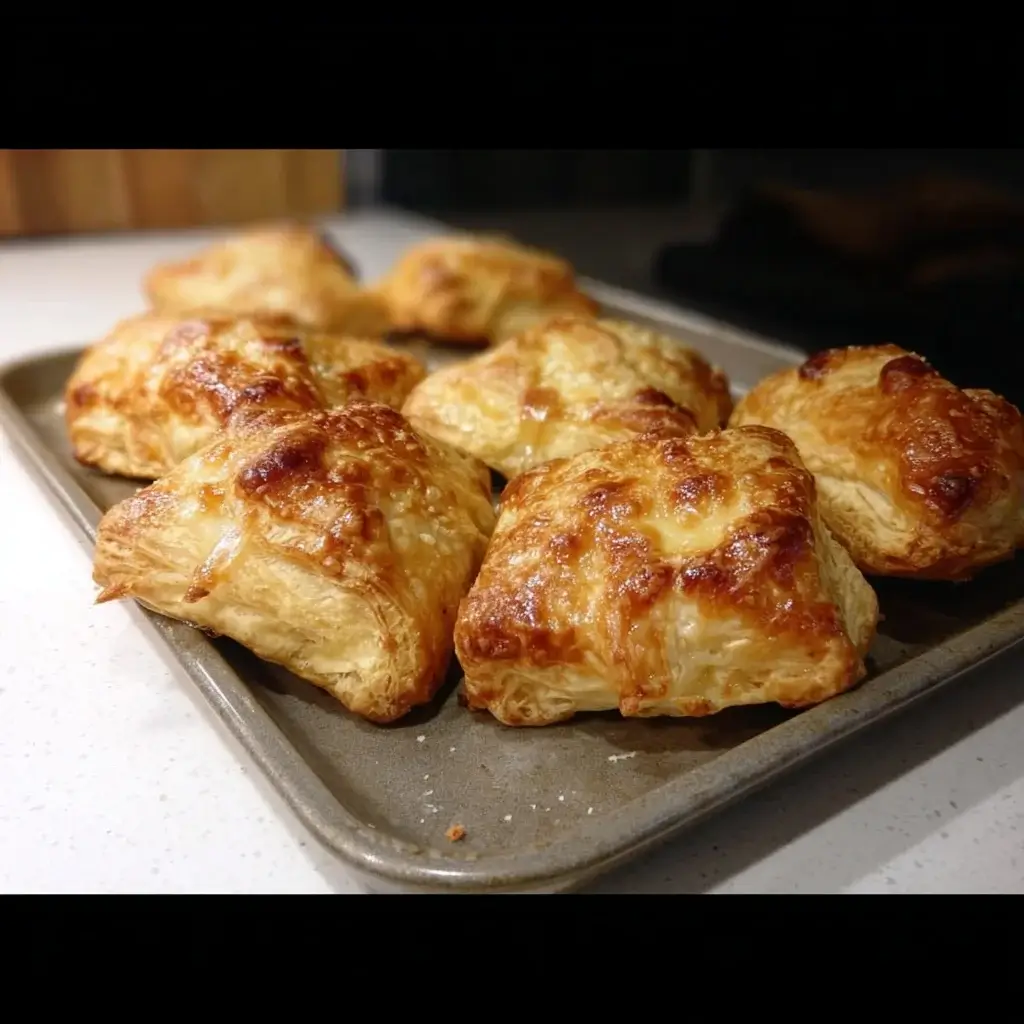
There are certain recipes that are more than just food; they are pure, unadulterated comfort wrapped in a cloak of simple elegance. These Puff Pastry Cheese Pockets are precisely that. I vividly recall the first time I made them. It was for a last-minute get-together, one of those impromptu gatherings where you have very little time to prepare but still want to impress. I had a sheet of puff pastry in my freezer—my perennial kitchen savior—and a random assortment of cheeses in the fridge. With a bit of hope and a flurry of activity, I whipped up these little parcels of goodness. As they baked, my kitchen filled with the most incredible aroma of toasting butter and nutty, melting cheese. When I pulled the tray from the oven, they were puffed up like golden pillows, glistening and promising a flaky, cheesy reward. They were gone in less than ten minutes. The sound of the delicate, flaky shatter of the pastry giving way to the molten, gooey cheese center, followed by contented sighs, was all the validation I needed. Since that day, these cheese pockets have become my signature appetizer, my go-to snack for movie nights, and the one thing my family requests for every holiday. They are deceptively simple, endlessly versatile, and deliver a “wow” factor every single time.
The Ultimate Puff Pastry Cheese Pockets: A Symphony of Flaky, Cheesy Goodness
Welcome to a recipe that proves that the most memorable dishes are often the simplest. These Puff Pastry Cheese Pockets are a masterclass in texture and flavor, combining the light, airy, and buttery layers of puff pastry with a rich, savory, and gloriously molten cheese filling. This is the kind of recipe that belongs in every home cook’s repertoire, ready to be deployed for virtually any occasion.
Why This Recipe is a Game-Changer
Before we dive into the buttery details, let’s explore what makes this recipe so special and why it will undoubtedly become one of your favorites.
- Effortless Elegance: Using store-bought puff pastry is the ultimate kitchen hack. It allows you to create appetizers that look and taste like they came from a high-end bakery with minimal effort. The results are consistently impressive.
- Insanely Delicious: The combination of flaky, buttery pastry and a warm, gooey, savory cheese filling is a universally beloved flavor profile. It’s simple, classic, and utterly irresistible to kids and adults alike.
- Incredibly Versatile: These pockets are the chameleons of the culinary world. Serve them as a sophisticated appetizer for a dinner party, a comforting snack on a cozy afternoon, a satisfying light lunch alongside a salad, or even as part of a brunch spread.
- Perfect for Making Ahead: As a host, make-ahead recipes are golden. You can assemble these pockets in advance and bake them fresh when your guests arrive, filling your home with an amazing aroma and saving you from last-minute stress.
- Completely Customizable: This recipe is a perfect canvas for your creativity. The cheese filling can be adapted in countless ways, allowing you to use what you have on hand or cater to specific tastes. We’ll explore some exciting variations further down.
Choosing Your Ingredients: The Foundation of Flavor
The beauty of this recipe lies in its simplicity, which means the quality of each ingredient truly shines through. Understanding the role of each component will empower you to create the best possible cheese pockets.
The Star Player: Puff Pastry
This is the magical foundation of our recipe.
- The Best Choice: All-butter puff pastry is highly recommended. The butter creates superior flavor and a more tender, flaky texture compared to versions made with other fats. Most grocery stores carry excellent quality frozen puff pastry in the freezer aisle.
- The Golden Rule: The number one rule when working with puff pastry is to keep it cold. The pastry gets its “puff” from the distinct layers of butter and dough. When the cold butter hits the hot oven, it releases steam, pushing the layers of dough apart and creating that signature flakiness. If the pastry gets too warm, the butter will melt into the dough before baking, resulting in a greasy, flat pocket instead of a light, airy one.
The Heart of the Matter: The Cheese Filling
This is where you can truly make the recipe your own. For the perfect cheese pocket, a combination of cheeses is ideal.
- The Melter (For the Gooey Factor): You need a cheese that melts smoothly and creates that satisfying “cheese pull.” Excellent choices include:
- Gruyère: My top recommendation. It’s a classic Swiss cheese with a wonderfully nutty, slightly sweet, and earthy flavor that is incredibly sophisticated.
- Fontina: An Italian cheese that is mild, nutty, and melts like a dream.
- Sharp White Cheddar: Provides a classic, tangy flavor that is always a crowd-pleaser.
- Provolone or Low-Moisture Mozzarella: Mild and reliable melters.
- The Flavor Booster (For Depth): A hard, aged cheese adds a salty, savory punch that elevates the entire filling.
- Parmesan (Parmigiano-Reggiano): Adds a complex, nutty, and salty depth of flavor.
- Pecorino Romano: A sheep’s milk cheese that is saltier and tangier than Parmesan, providing a sharp bite.
- The Creamy Binder: This ingredient adds creaminess and helps hold the grated cheese together.
- Cream Cheese: My secret weapon. A small amount of softened cream cheese adds a subtle tang and a wonderfully creamy texture to the filling, preventing it from becoming oily.
The Finishing Touches: The Egg Wash
Don’t skip this step! An egg wash is what gives the finished pockets their beautiful, glossy, deep golden-brown sheen. It also helps any toppings, like sesame seeds or flaky salt, adhere to the surface. It’s a simple mixture of an egg whisked with a small amount of water or milk.
Complete Ingredients for Flaky Cheese Pockets
Yields: 9 pockets
Prep time: 20 minutes
Cook time: 18-22 minutes
- For the Pockets:
- 1 sheet (approx. 9.5 x 9.5 inches or 24 x 24 cm) of frozen puff pastry, thawed according to package directions
- For the Cheese Filling:
- 1/2 cup (2 oz or 56g) freshly grated Gruyère cheese
- 1/4 cup (1 oz or 28g) freshly grated Parmesan cheese
- 2 tablespoons full-fat cream cheese, softened to room temperature
- 1 large egg yolk
- 1 tablespoon finely chopped fresh chives or parsley (optional)
- 1/4 teaspoon black pepper, freshly cracked
- Pinch of salt (be mindful as the cheeses are salty)
- Pinch of Dijon mustard or garlic powder (optional, for extra flavor)
- For the Egg Wash and Topping:
- 1 large egg, lightly beaten
- 1 teaspoon water or milk
- Optional toppings: Sesame seeds, poppy seeds, everything bagel seasoning, or flaky sea salt
Step-by-Step Instructions for Perfect Pockets
Follow these detailed steps to ensure your cheese pockets are puffed, golden, and perfectly sealed every time.
Step 1: Prepare Your Workstation and Pastry
- Thaw Correctly: Thaw the puff pastry according to the package instructions. This usually involves leaving it in the refrigerator for several hours or on the counter for about 40 minutes. You want it to be pliable enough to unfold without cracking, but still very cold.
- Preheat and Prep: Preheat your oven to 400°F (200°C). Line a large baking sheet with parchment paper. This prevents sticking and makes cleanup a breeze.
- Unfold and Cut: Lightly flour your work surface. Gently unfold the puff pastry sheet. If it’s not a perfect square, use a rolling pin to gently roll it into an even 9×9 inch or 10×10 inch square. Use a sharp knife or a pizza cutter to cut the sheet into 9 equal squares (3 cuts by 3 cuts).
Step 2: Create the Luscious Cheese Filling
- Combine Ingredients: In a medium bowl, combine the freshly grated Gruyère, grated Parmesan, softened cream cheese, and egg yolk.
- Add Flavor: Add the chopped fresh chives (if using), black pepper, salt, and optional Dijon mustard or garlic powder.
- Mix Thoroughly: Use a fork or a small spatula to mix everything together until it’s well combined into a thick, paste-like consistency.
Step 3: Assemble the Cheese Pockets
- Portion the Filling: Place a heaping teaspoon (about 1.5 teaspoons) of the cheese mixture into the center of each pastry square. It’s crucial not to overfill them, as this is the primary reason pockets leak during baking.
- Prepare the Egg Wash: In a small bowl, whisk together the whole egg and the teaspoon of water or milk until smooth.
- Seal the Pockets: Using your finger or a pastry brush, brush a thin layer of the egg wash around the edges of one half of each square. This will act as the “glue” to seal the pockets.
- Fold and Crimp: Gently fold one corner of the square over to the opposite corner to form a triangle. Press down firmly on the edges with your fingers to seal. For a decorative and extra-secure seal, use the tines of a fork to gently crimp the edges.
- Transfer and Chill: Carefully transfer the assembled pockets to the prepared parchment-lined baking sheet, leaving at least an inch of space between them. For the best possible puff, place the entire baking sheet in the refrigerator or freezer for 15 minutes to chill the pockets before baking.
Step 4: Bake to Golden Perfection
- Brush and Vent: Remove the chilled pockets from the fridge. Brush the tops of each pocket generously with the remaining egg wash. This will give them a beautiful shine. Using the tip of a sharp knife, cut a small slit or “vent” in the top of each pocket. This allows steam to escape during baking and prevents them from bursting open.
- Add Toppings: If desired, sprinkle the tops with sesame seeds, everything bagel seasoning, or a pinch of flaky sea salt.
- Bake: Place the baking sheet in the preheated oven and bake for 18-22 minutes, or until the pockets are deeply puffed, golden brown, and crisp. You may see a tiny bit of cheese bubbling out of the vent, which is perfectly normal.
- Cool and Serve: Let the cheese pockets cool on the baking sheet for 5-10 minutes before serving. This allows the molten cheese inside to set up slightly. Serve warm.
Nutrition Facts (Estimated)
- Servings: 9 pockets
- Calories per serving: Approximately 180-220 kcal (This is an estimate and can vary based on the specific brand of puff pastry and types of cheese used.)
Preparation and Cooking Time
- Preparation Time: 20 minutes (plus chilling time)
- Cooking Time: 18-22 minutes
- Total Time: Approximately 45 minutes
How to Serve Your Puff Pastry Cheese Pockets
These golden beauties are fantastic on their own, but they can be the star of many different culinary scenes.
- As a Standalone Appetizer:
- Arrange them on a platter while still warm from the oven.
- Serve with a variety of dipping sauces for an interactive experience.
- Perfect Dipping Sauces:
- Sweet: Fig jam, apricot preserves, or a drizzle of hot honey.
- Savory: A warm marinara sauce or a zesty aioli.
- Herby: A fresh pesto or a ranch-style dip.
- As Part of a Meal:
- Serve alongside a bowl of creamy tomato soup for the ultimate gourmet “grilled cheese” experience.
- Pair with a simple green salad with a sharp vinaigrette for a delightful and light lunch.
- Include them on a brunch board along with fruit, meats, and other pastries.
5 Essential Tips for Flawless Cheese Pockets
- Keep Everything Cold, Always: This is the most important tip. Work quickly, and if you feel your pastry getting soft or sticky at any point, pop it back in the fridge for 10-15 minutes. Chilling the assembled pockets before baking is the pro secret to achieving the maximum puff.
- Do Not Overfill: It’s tempting to pack in as much cheese as possible, but this is the number one cause of blowouts. A heaping teaspoon is the perfect amount to get a gooey center without the filling leaking out and burning on the pan.
- Seal and Vent for Success: A double seal (fingers then fork) is your best insurance policy against leaks. The small vent on top is equally crucial; it’s a pressure release valve that lets steam escape, preventing the pocket from bursting at the seams.
- Embrace the Power of the Egg Wash: The egg wash is for more than just looks. It creates a beautiful, glossy, professional-looking finish and is the key to getting toppings to stick. Don’t skip it!
- Grate Your Own Cheese: Avoid the pre-shredded bags of cheese. They are often coated in starches like potato starch or cellulose to prevent caking, which can inhibit melting and create a slightly gritty texture. Grating a block of cheese yourself takes only a minute and results in a much smoother, creamier, and more flavorful melt.
Creative Variations to Make Them Your Own
This recipe is a perfect template for your culinary imagination.
- Spinach and Feta: Sautéed spinach (squeezed very dry) mixed with crumbled feta, cream cheese, and a pinch of dill.
- Bacon and Cheddar: Crumbled crispy bacon mixed with sharp cheddar and chives.
- Mushroom and Swiss: Finely chopped and sautéed mushrooms and garlic mixed with grated Swiss cheese and a touch of thyme.
- Jalapeño Popper: Finely diced jalapeños (fresh or pickled) mixed with cream cheese, cheddar, and a bit of garlic powder.
- Sweet Variations: You can also take this concept sweet! Fill with a spoonful of apple pie filling and a sprinkle of cinnamon, or a piece of good quality chocolate for a simple pain au chocolat-style treat.
Frequently Asked Questions (FAQ)
1. Can I make these cheese pockets ahead of time?
Yes! This is one of their best features. Assemble the pockets completely (but do not apply the egg wash), place them on a parchment-lined baking sheet, and freeze until solid. Once frozen, transfer them to a freezer-safe bag or container. They can be stored for up to 2 months. When ready to bake, there’s no need to thaw. Just place them on your baking sheet, brush with egg wash, and bake from frozen, adding 5-7 minutes to the total baking time.
2. How do I reheat leftovers?
Leftover cheese pockets can be stored in an airtight container in the fridge for up to 3 days. To reheat and restore their crispness, avoid the microwave at all costs, as it will make them soggy. The best method is to place them in a 350°F (175°C) oven or an air fryer for 5-8 minutes until warmed through and flaky again.
3. My cheese pockets leaked everywhere! What did I do wrong?
The most common reasons for leaking are: 1) Overfilling the pockets, 2) Not sealing the edges securely enough, or 3) Forgetting to cut a steam vent on top. Follow the “less is more” rule for the filling, press firmly to seal, and always make that little slit on top.
4. Can I use different shapes instead of triangles?
Absolutely! You can cut the pastry into circles, place the filling on one half, and fold it over to create half-moons. Or, you can use two squares per pocket, placing the filling on one and laying the second square on top, crimping all four sides to create a square or rectangular pocket.
5. Can I make these in an air fryer?
Yes, they work beautifully in an air fryer! Assemble as directed. Preheat your air fryer to 375°F (190°C). Place the pockets in a single layer in the air fryer basket (do not overcrowd) and cook for 8-12 minutes, or until deeply golden brown and puffed.
Conclusion: Your Go-To Recipe for Effortless Elegance
These Puff Pastry Cheese Pockets are the perfect embodiment of simple, satisfying, and sophisticated cooking. They are a celebration of flaky, buttery, cheesy perfection, requiring minimal effort for a maximum return in flavor and praise. Whether you need a quick appetizer to dazzle your guests, a comforting snack to brighten your day, or a versatile component for a larger meal, this recipe is a reliable and delicious solution. Keep a box of puff pastry in your freezer, and you are never more than 30 minutes away from creating these irresistible golden treasures.
Print
Puff Pastry Cheese Pockets recipe
Ingredients
-
For the Pockets:
-
1 sheet (approx. 9.5 x 9.5 inches or 24 x 24 cm) of frozen puff pastry, thawed according to package directions
-
-
For the Cheese Filling:
-
1/2 cup (2 oz or 56g) freshly grated Gruyère cheese
-
1/4 cup (1 oz or 28g) freshly grated Parmesan cheese
-
2 tablespoons full-fat cream cheese, softened to room temperature
-
1 large egg yolk
-
1 tablespoon finely chopped fresh chives or parsley (optional)
-
1/4 teaspoon black pepper, freshly cracked
-
Pinch of salt (be mindful as the cheeses are salty)
-
Pinch of Dijon mustard or garlic powder (optional, for extra flavor)
-
-
For the Egg Wash and Topping:
-
1 large egg, lightly beaten
-
1 teaspoon water or milk
-
Optional toppings: Sesame seeds, poppy seeds, everything bagel seasoning, or flaky sea salt
-
Instructions
Step 1: Prepare Your Workstation and Pastry
-
Thaw Correctly: Thaw the puff pastry according to the package instructions. This usually involves leaving it in the refrigerator for several hours or on the counter for about 40 minutes. You want it to be pliable enough to unfold without cracking, but still very cold.
-
Preheat and Prep: Preheat your oven to 400°F (200°C). Line a large baking sheet with parchment paper. This prevents sticking and makes cleanup a breeze.
-
Unfold and Cut: Lightly flour your work surface. Gently unfold the puff pastry sheet. If it’s not a perfect square, use a rolling pin to gently roll it into an even 9×9 inch or 10×10 inch square. Use a sharp knife or a pizza cutter to cut the sheet into 9 equal squares (3 cuts by 3 cuts).
Step 2: Create the Luscious Cheese Filling
-
Combine Ingredients: In a medium bowl, combine the freshly grated Gruyère, grated Parmesan, softened cream cheese, and egg yolk.
-
Add Flavor: Add the chopped fresh chives (if using), black pepper, salt, and optional Dijon mustard or garlic powder.
-
Mix Thoroughly: Use a fork or a small spatula to mix everything together until it’s well combined into a thick, paste-like consistency.
Step 3: Assemble the Cheese Pockets
-
Portion the Filling: Place a heaping teaspoon (about 1.5 teaspoons) of the cheese mixture into the center of each pastry square. It’s crucial not to overfill them, as this is the primary reason pockets leak during baking.
-
Prepare the Egg Wash: In a small bowl, whisk together the whole egg and the teaspoon of water or milk until smooth.
-
Seal the Pockets: Using your finger or a pastry brush, brush a thin layer of the egg wash around the edges of one half of each square. This will act as the “glue” to seal the pockets.
-
Fold and Crimp: Gently fold one corner of the square over to the opposite corner to form a triangle. Press down firmly on the edges with your fingers to seal. For a decorative and extra-secure seal, use the tines of a fork to gently crimp the edges.
-
Transfer and Chill: Carefully transfer the assembled pockets to the prepared parchment-lined baking sheet, leaving at least an inch of space between them. For the best possible puff, place the entire baking sheet in the refrigerator or freezer for 15 minutes to chill the pockets before baking.
Step 4: Bake to Golden Perfection
-
Brush and Vent: Remove the chilled pockets from the fridge. Brush the tops of each pocket generously with the remaining egg wash. This will give them a beautiful shine. Using the tip of a sharp knife, cut a small slit or “vent” in the top of each pocket. This allows steam to escape during baking and prevents them from bursting open.
-
Add Toppings: If desired, sprinkle the tops with sesame seeds, everything bagel seasoning, or a pinch of flaky sea salt.
-
Bake: Place the baking sheet in the preheated oven and bake for 18-22 minutes, or until the pockets are deeply puffed, golden brown, and crisp. You may see a tiny bit of cheese bubbling out of the vent, which is perfectly normal.
-
Cool and Serve: Let the cheese pockets cool on the baking sheet for 5-10 minutes before serving. This allows the molten cheese inside to set up slightly. Serve warm.
Nutrition
- Serving Size: one normal portion
- Calories: 180-220 kcal