")

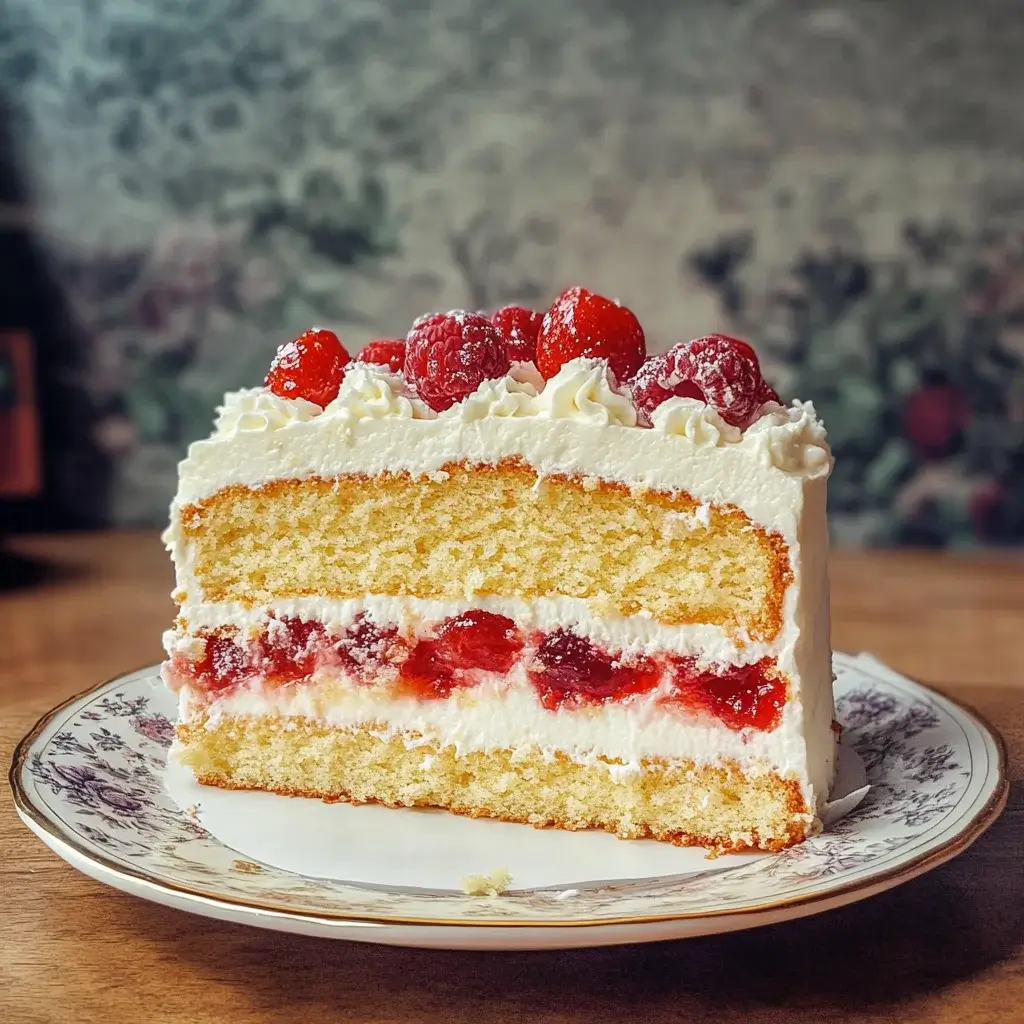
There’s something inherently comforting and elegantly simple about a Victoria Sponge Cake. It doesn’t rely on flashy decorations or complex flavour combinations; its beauty lies in its perfect execution – two layers of light, buttery sponge sandwiching a generous layer of sweet jam and fluffy cream. The first time I successfully baked one that rose perfectly, had a tender crumb, and didn’t sink in the middle felt like a true baking milestone. I remember bringing it to a family Sunday gathering, dusted simply with powdered sugar, feeling quietly proud. The reaction was immediate – appreciative murmurs about its classic taste, how light it felt, and how it reminded everyone of traditional afternoon teas. My grandmother, a formidable baker herself, gave a rare nod of approval. Since then, the Victoria Sponge has become my go-to recipe for moments that call for uncomplicated deliciousness. It’s reliable, relatively quick to whip up, and universally loved. It’s the taste of tradition, of simple pleasures, and achieving that perfect bake is always deeply satisfying.
Ingredients for a Perfect Victoria Sponge Cake
Creating this quintessential British cake relies on good quality ingredients and, traditionally, equal weights of butter, sugar, and flour to the weight of the eggs. Using measuring cups is common, but weighing provides the most consistent accuracy, which is key for sponge cakes.
For the Sponge Layers:
- 1 cup (225g) Unsalted Butter: Crucial for flavour and texture. Use good quality butter, softened to room temperature. This is vital for the creaming process. To check if it’s soft enough, it should yield easily when pressed gently but not be greasy or melted. Using salted butter is possible, but omit the added salt later in the recipe.
- 1 cup (225g) Granulated Sugar or Caster Sugar: Granulated sugar works well, but caster sugar (superfine sugar) dissolves more easily during creaming, potentially leading to a lighter texture. Avoid powdered sugar.
- 4 Large Eggs: Eggs provide structure, richness, leavening, and moisture. They must be at room temperature to emulsify properly with the butter and sugar, creating a stable batter that traps air effectively. To bring cold eggs to room temperature quickly, place them in a bowl of warm (not hot) water for 5-10 minutes. Weighing the eggs (in their shells) first and then matching the weight of butter, sugar, and flour is the most traditional method (aim for approx. 225g total egg weight, usually 4 large UK eggs or US large eggs).
- 1 teaspoon Vanilla Extract: Enhances the flavour of the sponge, complementing the butter and eggs. Use pure vanilla extract for the best taste.
- 2 cups (225g) Self-Rising Flour: This flour contains a raising agent (like baking powder) already mixed in, which is traditional for Victoria Sponge. If you cannot find self-rising flour, you can substitute 2 cups (225g) All-Purpose/Plain Flour PLUS 2 teaspoons Baking Powder. Ensure the baking powder is fresh. Sifting the flour (and baking powder, if using) is highly recommended to aerate it and remove lumps, contributing to a lighter cake.
- Pinch of Salt (if using unsalted butter and All-Purpose/Plain Flour): Salt enhances the overall flavours and balances the sweetness. Omit if using self-rising flour (which often contains salt) or salted butter.
- 1-2 tablespoons Milk (Optional, at room temperature): Sometimes needed at the end if the batter seems slightly too stiff. It helps achieve the correct dropping consistency. Whole milk is preferred for richness.
For the Filling & Topping:
- ½ cup (about 150-170g) Raspberry Jam: Good quality seedless raspberry jam is the classic choice. Strawberry jam is another popular option. Choose a jam with good fruit content and not overly sweet.
- 1 cup (240ml) Heavy Cream (Double Cream in the UK) OR Classic Buttercream:
- For Whipped Cream Filling: Use cold heavy cream (at least 35% fat content). You can optionally add 1-2 tablespoons of powdered sugar and ½ teaspoon vanilla extract while whipping for flavour and stability.
- For Buttercream Filling: Cream together ½ cup (113g) softened unsalted butter with 1 cup (120g) sifted powdered sugar and ½ teaspoon vanilla extract until light and fluffy. A splash of milk might be needed to reach desired consistency. This is a sweeter, more stable filling than fresh cream.
- Powdered Sugar (Icing Sugar) for dusting: For the classic, simple finish on top.
Step-by-Step Instructions: Baking the Quintessential Victoria Sponge
The key to a light and tender Victoria Sponge lies in the creaming method and gentle handling. Follow these steps carefully for classic results. Ensure all your ingredients (butter, eggs, milk if using) are at room temperature before you begin.
1. Prepare the Pans and Oven:
* Preheat your oven to 350°F (180°C) or 325°F (160°C) if using a fan/convection oven. Position an oven rack in the center of the oven.
* Grease two 8-inch (20cm) round cake pans thoroughly with butter or baking spray.
* Line the bottom of each pan with a circle of parchment paper. Grease the parchment paper as well.
* Lightly flour the greased sides of the pans, tapping out any excess flour. This “grease, line, grease, flour” method ensures the cakes release easily without sticking. Set the prepared pans aside.
2. Cream the Butter and Sugar:
* Place the softened unsalted butter into a large mixing bowl or the bowl of a stand mixer fitted with the paddle attachment.
* Beat the butter on medium speed for about 1 minute until smooth and creamy.
* Add the granulated or caster sugar to the butter.
* Increase the speed to medium-high and beat the butter and sugar together for a full 3-5 minutes. The mixture should become very pale, light in texture, and significantly increase in volume. This step is crucial – it incorporates air into the batter, which is essential for a light sponge. Scrape down the sides and bottom of the bowl periodically with a rubber spatula to ensure even mixing.
3. Incorporate the Eggs:
* Lightly whisk the room temperature eggs in a separate small bowl.
* With the mixer on medium-low speed, gradually add the beaten eggs to the creamed butter and sugar mixture, a little bit at a time. Allow each addition to fully incorporate before adding the next. Adding the eggs too quickly or when they are cold can cause the mixture to curdle (look split or lumpy).
* If the mixture does start to look curdled, don’t panic. Add a tablespoon of your measured flour along with the next bit of egg – this often helps bring it back together.
* Once all the eggs are incorporated, beat for another minute until the mixture is smooth and well combined. Scrape down the bowl again.
* Beat in the vanilla extract.
4. Sift and Fold in the Flour:
* If using Self-Rising Flour: Sift the flour directly over the wet ingredients in the mixing bowl.
* If using All-Purpose/Plain Flour: Whisk the flour, baking powder, and pinch of salt (if using) together in a separate bowl first, then sift this mixture over the wet ingredients. Sifting aerates the flour and ensures the baking powder is evenly distributed, preventing dense spots or large air bubbles.
* Using a large metal spoon or rubber spatula, gently fold the sifted dry ingredients into the wet ingredients. Start by cutting down through the middle of the mixture, scraping along the bottom, and bringing the batter up and over. Rotate the bowl a quarter turn and repeat. Continue this gentle folding motion only until no streaks of flour remain.
* Crucially, do NOT overmix. Overmixing develops the gluten in the flour, which will result in a tough, heavy, or chewy cake instead of a light, tender sponge. Stop folding as soon as the flour is just incorporated.
5. Adjust Consistency (If Needed):
* Check the batter consistency. It should be a ‘dropping consistency’ – meaning if you lift a spoonful of batter, it should drop easily off the spoon within about 5 seconds, but not be runny.
* If the batter seems too stiff (often happens if eggs were slightly small or flour absorbed more moisture), gently fold in 1-2 tablespoons of room temperature milk until the correct consistency is reached. Add only one tablespoon at a time.
6. Divide Batter and Bake:
* Carefully divide the batter evenly between the two prepared cake pans. A kitchen scale can be helpful here for perfect accuracy, ensuring both layers bake identically. Otherwise, eyeball it carefully.
* Gently smooth the tops of the batter with the back of a spoon or a small offset spatula, pushing the batter slightly towards the edges of the pan (this can help prevent a large dome from forming).
* Place the pans immediately into the preheated oven on the center rack. Ensure there is space between them for air circulation if possible.
* Bake for 20-25 minutes. Do not open the oven door for the first 15-20 minutes, as the temperature change can cause the delicate sponge structure to collapse.
* The cakes are done when they are golden brown, have pulled away slightly from the sides of the pans, and spring back immediately when gently pressed in the center with a fingertip. Alternatively, a wooden skewer or toothpick inserted into the center should come out clean, with no wet batter attached (a few moist crumbs are okay).
7. Cool the Cakes:
* Once baked, carefully remove the pans from the oven and place them on a wire cooling rack.
* Let the cakes cool in their pans for 5-10 minutes. This allows them to set slightly, making them less fragile.
* After 5-10 minutes, run a thin knife or offset spatula around the edge of each cake to ensure it’s loosened from the sides.
* Carefully invert each cake onto the wire rack. Gently peel off the parchment paper from the bottoms.
* Turn the cakes right-side up on the wire rack and let them cool completely to room temperature before filling and assembling. This can take 1-2 hours. Attempting to fill warm cakes will melt the cream and make the jam slide out.
8. Prepare the Filling (While Cakes Cool):
* For Whipped Cream: Pour the cold heavy cream into a chilled mixing bowl. Using an electric mixer (or whisk and determination), whip the cream on medium-high speed until soft peaks form. If desired, add powdered sugar and vanilla and continue whipping until medium-stiff peaks form (the peaks should hold their shape but still look soft). Be careful not to overwhip, or it will turn grainy and eventually become butter.
* For Buttercream: Ensure butter is softened. Beat the butter until pale and fluffy. Gradually beat in the sifted powdered sugar until fully combined. Beat in the vanilla. If needed, add a splash of milk (1 tsp at a time) and beat until light, fluffy, and spreadable.
9. Assemble the Cake:
* Once the cake layers are completely cool, select the flatter of the two layers (or trim any significant dome off one layer with a serrated knife) and place it, bottom-side up (the side that was against the parchment paper), onto your serving plate or cake stand. This provides a flat base.
* Spread the raspberry (or strawberry) jam evenly over the surface of the bottom layer, leaving a small border (about ½ inch or 1 cm) around the edge to prevent it from squeezing out too much.
* Top the jam with the whipped cream or buttercream. Spread it evenly over the jam, again leaving a slight border. Using whipped cream requires serving the cake relatively soon after assembly. Buttercream is more stable.
* Carefully place the second cake layer on top of the filling, right-side up. Press down very gently to secure it.
* Classic Finish: Lightly dust the top of the cake generously with powdered sugar using a fine-mesh sieve.
10. Serve:
* Serve the Victoria Sponge Cake shortly after assembling, especially if using fresh whipped cream. Slice with a sharp, thin knife, wiping the blade clean between cuts for neat slices.
Nutritional Information (Estimated)
Please note these figures are approximations. Actual values depend heavily on the specific ingredients used (brands of butter, sugar, flour, jam, cream), the exact serving size, and whether buttercream or whipped cream is used. Buttercream filling will significantly increase the calorie and sugar content compared to lightly sweetened whipped cream.
- Servings: 8-10 slices
- Calories per Serving (approximate, based on 10 slices with whipped cream filling): 400-500 kcal
- Calories per Serving (approximate, based on 10 slices with buttercream filling): 500-650 kcal
This cake is a delightful treat, best enjoyed in moderation as part of a balanced diet. It’s primarily composed of carbohydrates (from flour, sugar, jam) and fats (from butter, eggs, cream).
Time Commitment: Planning Your Victoria Sponge Bake
This cake is relatively quick compared to more complex layer cakes.
- Preparation Time: 20-25 minutes (Measuring ingredients, preparing pans, mixing batter)
- Baking Time: 20-25 minutes
- Cooling Time: 1.5 – 2 hours (Essential passive time)
- Assembly Time: 5-10 minutes (Whipping cream/making buttercream, assembling)
- Total Time: Approximately 2.5 – 3 hours (with most of that being hands-off cooling time)
You can bake the sponges a day ahead, cool completely, wrap well in plastic wrap, and store at room temperature. Assemble with the filling just before serving for the best texture, especially with fresh cream.
How to Serve: Presenting Your Classic Creation
The beauty of a Victoria Sponge lies in its simplicity, which should extend to its presentation.
- Presentation:
- Cake Stand: Place the assembled cake on a simple, elegant cake stand or serving plate.
- Dusting: The classic finish is a generous dusting of powdered (icing) sugar over the top layer just before serving. Use a fine-mesh sieve for an even coating.
- Garnish (Optional): While not strictly traditional, a few fresh raspberries or strawberries placed in the center on top can add a lovely touch of colour.
- Slicing: Use a sharp, thin-bladed knife. For neat slices, dip the knife in hot water and wipe it clean between each cut, especially when cutting through cream.
- Occasions: Perfect for:
- Afternoon Tea (the quintessential pairing!)
- Garden Parties
- Birthdays (especially when a simple, elegant cake is desired)
- Picnics (if using buttercream filling for stability)
- Coffee Mornings
- Any occasion calling for a comforting, classic bake.
- Accompaniments:
- Beverages:
- Tea: A pot of freshly brewed tea (English Breakfast, Earl Grey, Darjeeling) is the ultimate classic pairing.
- Coffee: A light or medium roast coffee.
- Milk: For children (and some adults!).
- Food (Minimal Needed):
- Fresh Berries: A small bowl of fresh raspberries or strawberries served alongside can complement the jam filling.
- Extra Cream: A small jug of pouring cream or a bowl of whipped cream on the side for those who like extra.
- Beverages:
- Variations on the Classic:
- Jam: Swap raspberry for strawberry, apricot, cherry, or blackcurrant jam.
- Cream: Use clotted cream instead of whipped cream for a Cornish variation. Try flavouring the whipped cream with lemon zest or elderflower cordial.
- Citrus: Add the finely grated zest of 1 lemon or orange to the butter and sugar mixture during creaming for a subtle citrus note.
- Chocolate: While not traditional, you could make a chocolate version by replacing 2-3 tablespoons of flour with cocoa powder.
Baker’s Secrets: 5 Tips for Victoria Sponge Perfection
Mastering this seemingly simple cake often comes down to technique. Keep these tips in mind:
- Room Temperature is King: This is non-negotiable for a light sponge. Softened butter creams properly, incorporating maximum air. Room temperature eggs emulsify smoothly into the batter without curdling. Cold ingredients result in a dense, heavy cake. Take butter and eggs out of the fridge at least 1-2 hours before starting.
- Weigh Your Ingredients (Especially Eggs, Butter, Sugar, Flour): The traditional Victoria Sponge relies on the principle of equal weights. Using a kitchen scale is far more accurate than using cups, especially for flour. Weigh your eggs (in shells), then use the same weight for the butter, sugar, and self-rising flour. This balance is key to the cake’s structure and texture.
- Cream Thoroughly, Fold Gently: Master these two core techniques. Creaming the butter and sugar for a full 3-5 minutes until pale and fluffy incorporates the air needed for lightness. Then, when adding the sifted flour, fold just until combined using a large metal spoon or spatula. Overmixing at this stage develops gluten, leading to a tough cake. Treat the batter gently.
- Don’t Peek! (Avoid Opening the Oven Door Early): Sponge cakes are delicate while baking. Opening the oven door, especially during the first two-thirds of the baking time, causes a sudden drop in temperature that can make the rising cake collapse dramatically in the center. Resist the urge to peek until the cake looks set and mostly golden (around the 18-20 minute mark).
- Cool Completely Before Filling: Patience is required here. Assembling the cake while the sponges are still warm will melt the cream (causing it to weep or soak into the sponge) and make the jam runny and likely to slide out. Let the sponges cool completely on a wire rack before adding any filling or attempting to slice.
Frequently Asked Questions (FAQ) About Victoria Sponge Cake
Here are answers to some common questions about this beloved British bake:
- Q: Can I use all-purpose (plain) flour instead of self-rising flour?
- A: Yes, absolutely. Self-rising flour is simply plain flour with a raising agent already added. To substitute, use the same weight or volume of all-purpose/plain flour called for in the recipe, but add baking powder. A general rule of thumb is to add 1 teaspoon of baking powder per 1 cup (approx. 110-120g) of plain flour. So for this recipe using 2 cups (225g) of flour, you would add 2 teaspoons of baking powder. Whisk the baking powder thoroughly into the plain flour before sifting it over the wet ingredients to ensure it’s evenly distributed. Adding a pinch of salt is also recommended when using plain flour, as self-rising often contains salt.
- Q: Why did my Victoria Sponge sink in the middle?
- A: This is a common frustration! Several factors can cause a cake to sink:
- Opening the oven door too early: This causes a temperature drop, collapsing the delicate structure.
- Underbaking: The center wasn’t fully cooked and set, so it couldn’t support itself as it cooled. Ensure a skewer comes out clean.
- Overmixing: Too much mixing after adding flour can develop too much gluten and incorporate too much air in large, unstable bubbles that collapse.
- Incorrect oven temperature: If the oven is too hot, the outside cooks too quickly, setting before the center has risen properly, causing the middle to collapse later. If too cool, it may not rise sufficiently. Use an oven thermometer to check accuracy.
- Too much raising agent: Using too much baking powder or old/incorrectly measured self-rising flour can cause the cake to rise too rapidly and then collapse.
- A: This is a common frustration! Several factors can cause a cake to sink:
- Q: Can I make the Victoria Sponge ahead of time? How should I store it?
- A: Yes. The sponge layers themselves keep well. Bake the sponges, cool them completely on a wire rack, then wrap them tightly (individually) in plastic wrap. They can be stored at room temperature for up to 2 days. For longer storage, you can freeze the wrapped sponges for up to 2 months. Thaw overnight at room temperature before assembling. It’s best to assemble the cake (add jam and cream) shortly before serving, especially if using fresh whipped cream, as it doesn’t hold up well for long periods and can make the sponge soggy. A cake filled with buttercream is more stable and can be assembled a day ahead and stored in an airtight container at cool room temperature or in the fridge (bring to room temp before serving).
- Q: Can I freeze the assembled Victoria Sponge Cake?
- A: It’s generally not recommended to freeze the fully assembled cake, particularly if filled with fresh whipped cream. Whipped cream does not freeze and thaw well; its texture often becomes watery and grainy. Jam can also make the sponge soggy upon thawing. A cake filled with buttercream can be frozen (wrap well), but the texture of the sponge might be slightly compromised upon thawing. It’s always best to freeze the unfilled sponge layers separately and assemble the cake after thawing.
- Q: What’s the difference between filling with whipped cream versus buttercream?
- A: Both are delicious but offer different experiences:
- Whipped Cream: This is the lighter, fresher option. It uses heavy/double cream whipped until fluffy, often lightly sweetened. It provides a cool, airy contrast to the sponge and jam. However, it’s less stable, needs refrigeration, and the cake should be eaten within a day or so.
- Buttercream: Made by creaming butter and powdered sugar, this filling is much sweeter, richer, and denser than whipped cream. It’s also far more stable, holding its shape well at room temperature (unless it’s very hot) and allowing the cake to be made further in advance. Some traditionalists prefer only jam and a dusting of sugar, while others favour one cream filling over the other. Both are considered acceptable variations of the modern Victoria Sponge.
- A: Both are delicious but offer different experiences:
The Victoria Sponge Cake remains an enduring classic for a reason. Its elegance lies in its simplicity and the quality of its execution. By understanding the key techniques – proper creaming, gentle folding, correct baking, and patient cooling – you can reliably produce a light, tender, and delicious cake that’s perfect for sharing. Enjoy the process and the delightful results of this timeless British bake!
Print
Victoria sponge cake recipe
Ingredients
- 1 cup (225g) Unsalted Butter: Crucial for flavour and texture. Use good quality butter, softened to room temperature. This is vital for the creaming process. To check if it’s soft enough, it should yield easily when pressed gently but not be greasy or melted. Using salted butter is possible, but omit the added salt later in the recipe.
- 1 cup (225g) Granulated Sugar or Caster Sugar: Granulated sugar works well, but caster sugar (superfine sugar) dissolves more easily during creaming, potentially leading to a lighter texture. Avoid powdered sugar.
- 4 Large Eggs: Eggs provide structure, richness, leavening, and moisture. They must be at room temperature to emulsify properly with the butter and sugar, creating a stable batter that traps air effectively. To bring cold eggs to room temperature quickly, place them in a bowl of warm (not hot) water for 5–10 minutes. Weighing the eggs (in their shells) first and then matching the weight of butter, sugar, and flour is the most traditional method (aim for approx. 225g total egg weight, usually 4 large UK eggs or US large eggs).
- 1 teaspoon Vanilla Extract: Enhances the flavour of the sponge, complementing the butter and eggs. Use pure vanilla extract for the best taste.
- 2 cups (225g) Self-Rising Flour: This flour contains a raising agent (like baking powder) already mixed in, which is traditional for Victoria Sponge. If you cannot find self-rising flour, you can substitute 2 cups (225g) All-Purpose/Plain Flour PLUS 2 teaspoons Baking Powder. Ensure the baking powder is fresh. Sifting the flour (and baking powder, if using) is highly recommended to aerate it and remove lumps, contributing to a lighter cake.
- Pinch of Salt (if using unsalted butter and All-Purpose/Plain Flour): Salt enhances the overall flavours and balances the sweetness. Omit if using self-rising flour (which often contains salt) or salted butter.
- 1–2 tablespoons Milk (Optional, at room temperature): Sometimes needed at the end if the batter seems slightly too stiff. It helps achieve the correct dropping consistency. Whole milk is preferred for richness.
For the Filling & Topping:
- ½ cup (about 150-170g) Raspberry Jam: Good quality seedless raspberry jam is the classic choice. Strawberry jam is another popular option. Choose a jam with good fruit content and not overly sweet.
- 1 cup (240ml) Heavy Cream (Double Cream in the UK) OR Classic Buttercream:
- For Whipped Cream Filling: Use cold heavy cream (at least 35% fat content). You can optionally add 1-2 tablespoons of powdered sugar and ½ teaspoon vanilla extract while whipping for flavour and stability.
- For Buttercream Filling: Cream together ½ cup (113g) softened unsalted butter with 1 cup (120g) sifted powdered sugar and ½ teaspoon vanilla extract until light and fluffy. A splash of milk might be needed to reach desired consistency. This is a sweeter, more stable filling than fresh cream.
- Powdered Sugar (Icing Sugar) for dusting: For the classic, simple finish on top.
Instructions
1. Prepare the Pans and Oven:
* Preheat your oven to 350°F (180°C) or 325°F (160°C) if using a fan/convection oven. Position an oven rack in the center of the oven.
* Grease two 8-inch (20cm) round cake pans thoroughly with butter or baking spray.
* Line the bottom of each pan with a circle of parchment paper. Grease the parchment paper as well.
* Lightly flour the greased sides of the pans, tapping out any excess flour. This “grease, line, grease, flour” method ensures the cakes release easily without sticking. Set the prepared pans aside.
2. Cream the Butter and Sugar:
* Place the softened unsalted butter into a large mixing bowl or the bowl of a stand mixer fitted with the paddle attachment.
* Beat the butter on medium speed for about 1 minute until smooth and creamy.
* Add the granulated or caster sugar to the butter.
* Increase the speed to medium-high and beat the butter and sugar together for a full 3-5 minutes. The mixture should become very pale, light in texture, and significantly increase in volume. This step is crucial – it incorporates air into the batter, which is essential for a light sponge. Scrape down the sides and bottom of the bowl periodically with a rubber spatula to ensure even mixing.
3. Incorporate the Eggs:
* Lightly whisk the room temperature eggs in a separate small bowl.
* With the mixer on medium-low speed, gradually add the beaten eggs to the creamed butter and sugar mixture, a little bit at a time. Allow each addition to fully incorporate before adding the next. Adding the eggs too quickly or when they are cold can cause the mixture to curdle (look split or lumpy).
* If the mixture does start to look curdled, don’t panic. Add a tablespoon of your measured flour along with the next bit of egg – this often helps bring it back together.
* Once all the eggs are incorporated, beat for another minute until the mixture is smooth and well combined. Scrape down the bowl again.
* Beat in the vanilla extract.
4. Sift and Fold in the Flour:
* If using Self-Rising Flour: Sift the flour directly over the wet ingredients in the mixing bowl.
* If using All-Purpose/Plain Flour: Whisk the flour, baking powder, and pinch of salt (if using) together in a separate bowl first, then sift this mixture over the wet ingredients. Sifting aerates the flour and ensures the baking powder is evenly distributed, preventing dense spots or large air bubbles.
* Using a large metal spoon or rubber spatula, gently fold the sifted dry ingredients into the wet ingredients. Start by cutting down through the middle of the mixture, scraping along the bottom, and bringing the batter up and over. Rotate the bowl a quarter turn and repeat. Continue this gentle folding motion only until no streaks of flour remain.
* Crucially, do NOT overmix. Overmixing develops the gluten in the flour, which will result in a tough, heavy, or chewy cake instead of a light, tender sponge. Stop folding as soon as the flour is just incorporated.
5. Adjust Consistency (If Needed):
* Check the batter consistency. It should be a ‘dropping consistency’ – meaning if you lift a spoonful of batter, it should drop easily off the spoon within about 5 seconds, but not be runny.
* If the batter seems too stiff (often happens if eggs were slightly small or flour absorbed more moisture), gently fold in 1-2 tablespoons of room temperature milk until the correct consistency is reached. Add only one tablespoon at a time.
6. Divide Batter and Bake:
* Carefully divide the batter evenly between the two prepared cake pans. A kitchen scale can be helpful here for perfect accuracy, ensuring both layers bake identically. Otherwise, eyeball it carefully.
* Gently smooth the tops of the batter with the back of a spoon or a small offset spatula, pushing the batter slightly towards the edges of the pan (this can help prevent a large dome from forming).
* Place the pans immediately into the preheated oven on the center rack. Ensure there is space between them for air circulation if possible.
* Bake for 20-25 minutes. Do not open the oven door for the first 15-20 minutes, as the temperature change can cause the delicate sponge structure to collapse.
* The cakes are done when they are golden brown, have pulled away slightly from the sides of the pans, and spring back immediately when gently pressed in the center with a fingertip. Alternatively, a wooden skewer or toothpick inserted into the center should come out clean, with no wet batter attached (a few moist crumbs are okay).
7. Cool the Cakes:
* Once baked, carefully remove the pans from the oven and place them on a wire cooling rack.
* Let the cakes cool in their pans for 5-10 minutes. This allows them to set slightly, making them less fragile.
* After 5-10 minutes, run a thin knife or offset spatula around the edge of each cake to ensure it’s loosened from the sides.
* Carefully invert each cake onto the wire rack. Gently peel off the parchment paper from the bottoms.
* Turn the cakes right-side up on the wire rack and let them cool completely to room temperature before filling and assembling. This can take 1-2 hours. Attempting to fill warm cakes will melt the cream and make the jam slide out.
8. Prepare the Filling (While Cakes Cool):
* For Whipped Cream: Pour the cold heavy cream into a chilled mixing bowl. Using an electric mixer (or whisk and determination), whip the cream on medium-high speed until soft peaks form. If desired, add powdered sugar and vanilla and continue whipping until medium-stiff peaks form (the peaks should hold their shape but still look soft). Be careful not to overwhip, or it will turn grainy and eventually become butter.
* For Buttercream: Ensure butter is softened. Beat the butter until pale and fluffy. Gradually beat in the sifted powdered sugar until fully combined. Beat in the vanilla. If needed, add a splash of milk (1 tsp at a time) and beat until light, fluffy, and spreadable.
9. Assemble the Cake:
* Once the cake layers are completely cool, select the flatter of the two layers (or trim any significant dome off one layer with a serrated knife) and place it, bottom-side up (the side that was against the parchment paper), onto your serving plate or cake stand. This provides a flat base.
* Spread the raspberry (or strawberry) jam evenly over the surface of the bottom layer, leaving a small border (about ½ inch or 1 cm) around the edge to prevent it from squeezing out too much.
* Top the jam with the whipped cream or buttercream. Spread it evenly over the jam, again leaving a slight border. Using whipped cream requires serving the cake relatively soon after assembly. Buttercream is more stable.
* Carefully place the second cake layer on top of the filling, right-side up. Press down very gently to secure it.
* Classic Finish: Lightly dust the top of the cake generously with powdered sugar using a fine-mesh sieve.
10. Serve:
* Serve the Victoria Sponge Cake shortly after assembling, especially if using fresh whipped cream. Slice with a sharp, thin knife, wiping the blade clean between cuts for neat slices.
Nutrition
- Serving Size: one normal portion
- Calories: 500-650